
Index for the practice piece
- Intro and setup: click here to go to that page
- Row 1: that’s this page
- Row 2: click the link to go to that page
- Row 3 and finishing: click the link to go to that page
The video’s
The video for row 1: https://youtu.be/bxvvkLIHU3s
The video for extra tips: https://youtu.be/xUbPqQ7JAqc
Or see the links at the end of this page.
Row 1
Because we’re doing a small piece, and the chain row of color 2 is not very long, we will use a way of starting this by ‘weaving in’ color 2 through the openings of color 1. I will give away that we will do this row slightly different in the large project, but it differs just a little. Maybe you will find that way even slightly easier , but I thought this method was just a bit easier if you have never done this before. The nice thing about this method anyway is that the pattern is neatly ‘in pattern’ right away from the start.
Row 1a, color 1
There are several ways to make a first double crochet (dc) at the start of a row. Choose the way you like the most! It really doesn’t matter much, and you can experiment with this practice piece if you’re in doubt which way you will use. I kept it simple. I used 3 chains as a starting dc. After the starting dc (that I count as number 1) you need another chain stitch (ch). You will always make 1 ch in between 2 dc’s to get an open square. In my case this means I start with 4 ch’s for row 1a.
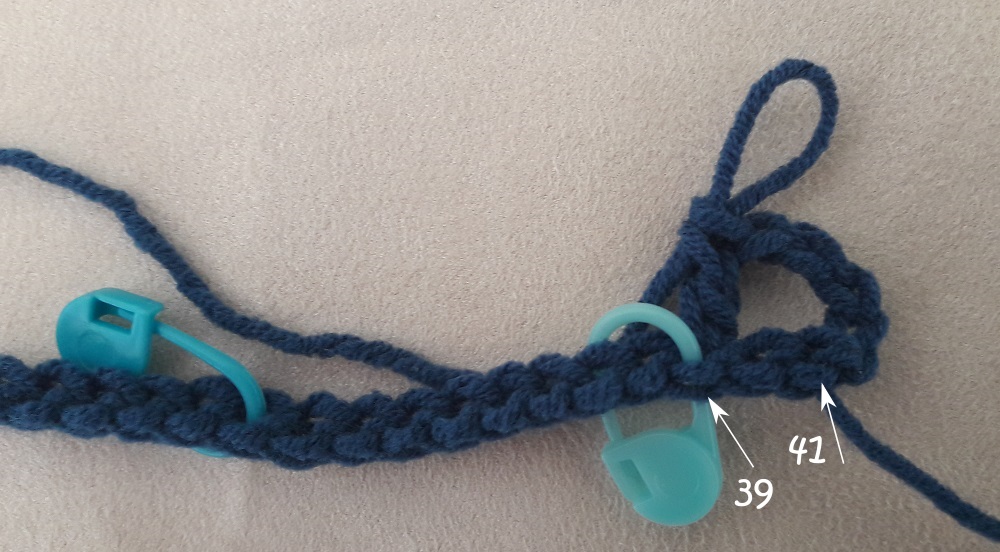
Next you will make your second dc at the place where you put your last stitch marker (in stitch 39). So stitch 41 was the place of your first (starting ) dc, you skip 1 stitch (stitch 40) and the place to insert your hook is in stitch 39.
You can now remove your stitch marker.

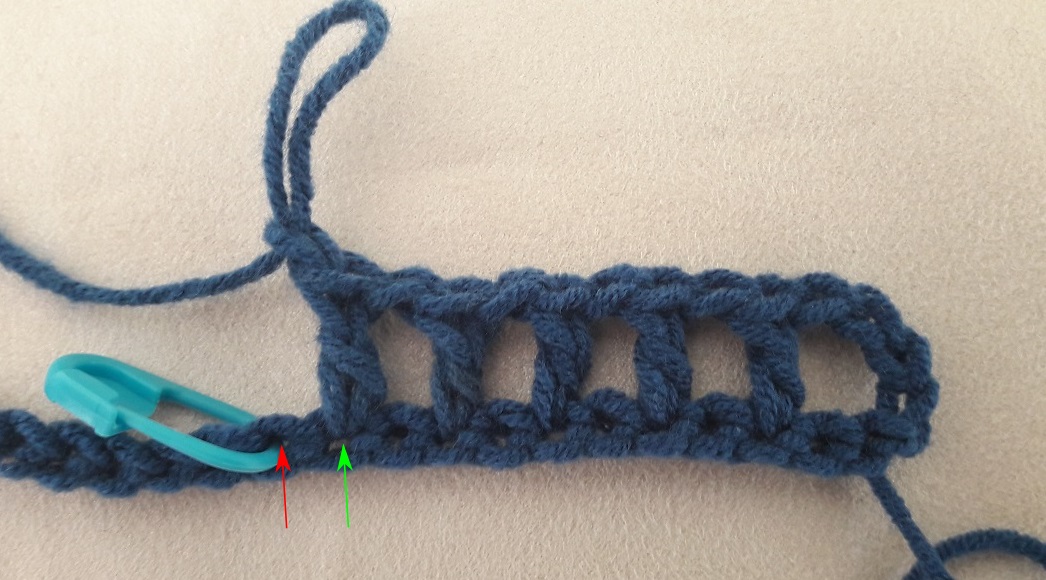
Next you will make 1 chain again, you skip 1 stitch of the setup row and you make the next dc in the stitch after that. You have now made 2 squares.
Checkpoint
Continue like this until you’ve come at your next stitch marker. When you look closely at the picture, at the green arrow, you see you have made your last dc in the stitch before the stitch marker. It is important that you’ve not ended up at the stitch marker itself, because this means something went wrong at the start. Check where you made the mistake end redo this part.
Your second check is that you have done 5 squares. Your third check is to see if you’ve done your chains in between each 2 dc’s.
If all of this is correct you can remove the stitch marker and continue.
Checkpoint
Continue until you’ve come to the next stitch marker. Again you can see in the picture at the green arrow where your last dc should have been made, which is again in the stitch before the stitch marker. You have now done 10 squares. Check again if you’ve made your chain stitches in between the dc’s .
If all of this is correct you can remove the stitch marker and continue.
Checkpoint
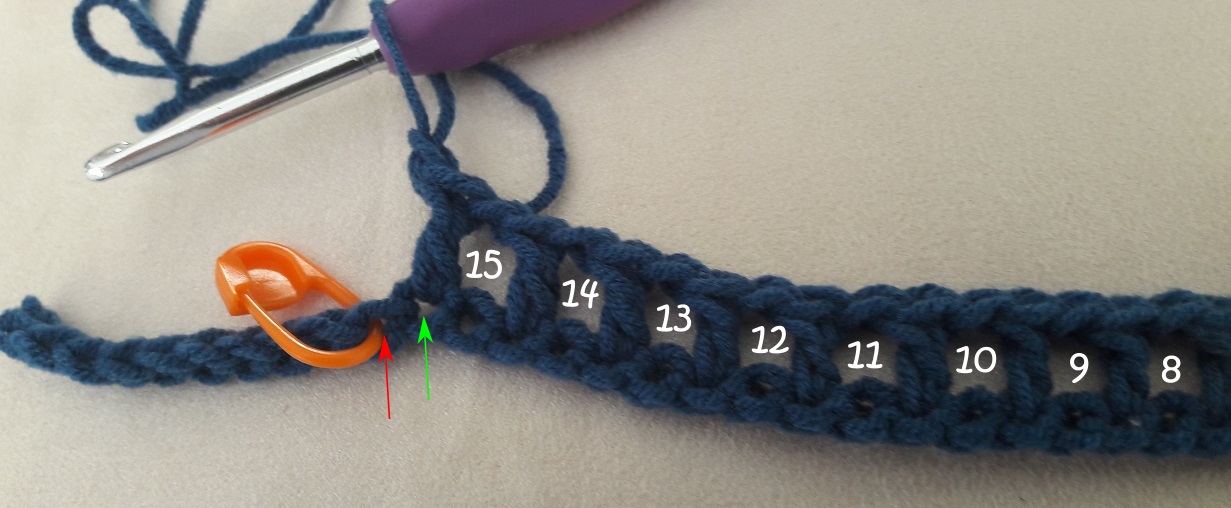
Check everything again. You should have done 15 squares now. Now finish the row.

You have now made all the squares. Count if you have 20. Your last dc should have been done in the last stitch of the setup row.
Row 1a is now finished!
Weaving in the setup row of color 2


For this part of the pattern you didn’t need the pattern charts yet, because we used a slightly different technique for making row 1a. But now we will be weaving the setup row of color 2 through the open squares of color 1, and for that we need this chart. Click again on the pictures to see the entire chart.
You see here that the pink is color 1, and the light blue is color 2. In the second chart I added circles around the spots that are important. I marked the posts of the dc’s of row 1a with purple, and I numbered the squares.
The most right post of square 1 is the side dc. This is always in color 1! This is also not on top or at the bottom, but just to the side. The same goes for the last dc of the row.
You see at the post between squares 1 and 2, that the light blue color is on top. This means with weaving through that color 2 will be on top of the second dc of color 1. At the post between squares 2 and 3 you see the pink is on top. this means color 2 is below color 1. And so it goes on the entire row, over, under, over, under.
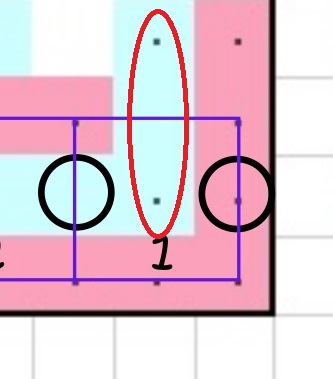 The start is also important. If you look at the 2nd chart, above where the ‘1’ is in square 1, you can see that the light blue goes over the upper part of square 1. I’ve marked that extra with red in the picture before this. This means that with crocheting the next row, row 1b, this color must be on top. And that is important now already! But I will show you that in a second with the pictures.

Click on the small pictures again to see the entire picture. Start with laying down your crocheted part of color 1. Put the end, where you just finished crocheting, at the left. Take care that you put the top at the top, like I show you in this first picture at the red circle.
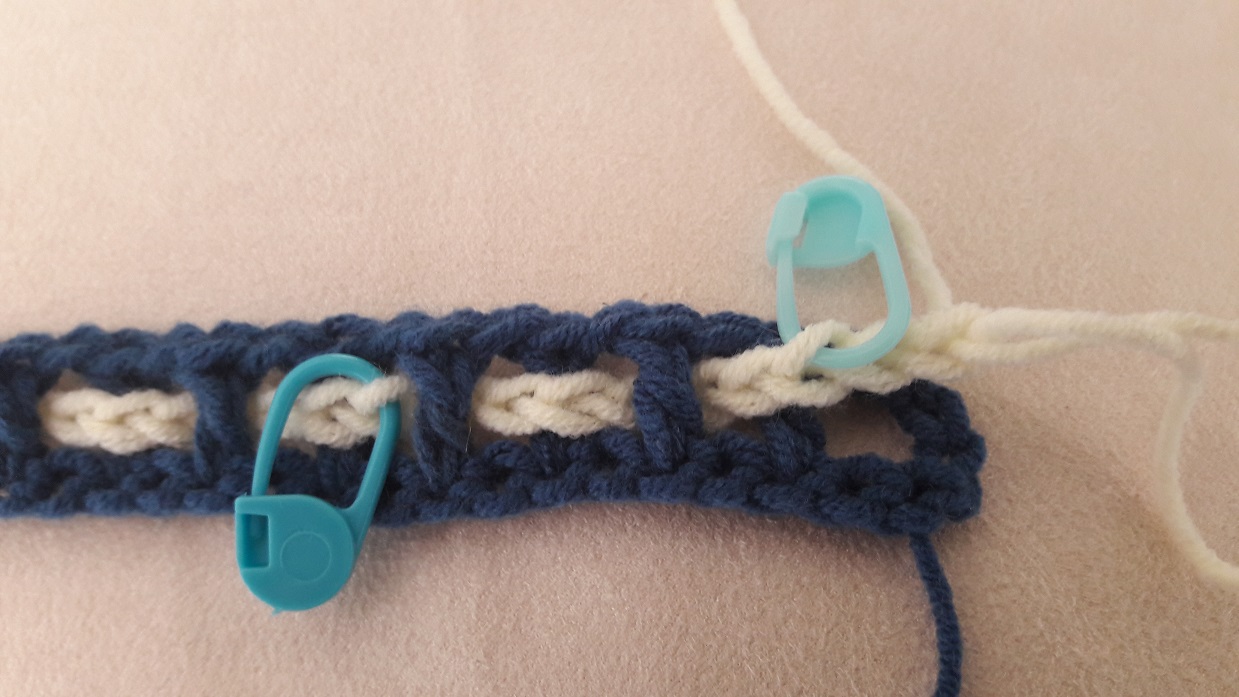
Start at the right side by laying the white setup row on top of the blue row, with the ‘tail’ of the setup row (the side with the slip knot) on the left and the side with the marker in stitch 37 on the right.
SUPERIMPORTANT!!!
When you’re weaving through the chain row, take care it doesn’t twist around. The V-shapes should be neatly on the front. If you do not do this, it will be very hard, when crocheting row 1b, to see where to insert your hook to make your stitches.
Now bring the ‘tail’ to the back through square 2 and back to the top again through square 3. Continue like this the entire row: back again through square 4, to the top through square 5, and so on. Don’t worry about where you should place the stitch markers, that will be fine. Just distribute them so that it lies ‘comfortable’.
When you’re finished, and you’ve done this correctly, you’ve gone to the back at the last square. Check this with the full picture.
If you look closely to the pattern chart of row 1a now that you’ve woven this through, you can see how this is matching.
Written pattern
Now we are ready to crochet row 1b, but first I will explain you something about the written pattern.
The description for row 1a is as follows:
-
- row 1a – front:
-
- color 2 on top
- side st
- *(back, front)* 10x
Explanation
Of each row I tell if it’s the front or the back of the work. Actually there isn’t something like a front- or backside, but with the pattern charts I show if it concerns the front or the back, so you can match it which eachother.
Each a-row, that’s always in color 1, starts with how to position color 2. On top or at the back. You have to put this right right away at the start of an a-row, because otherwise it will not be right at the start of a b-row of color 2. This can only be corrected by frogging the a-row, or cutting the thread and do it over again. So please pay attention to that!
After that the crochet instructions for the dc’s follow. I don’t explain how to do the dc’s, and to make a chain in between two dc’s, I assume that as basic knowledge for this technique. I only tell if you should make the dc’s on top or at the back. I always start with ‘side st’, which stands for the first dc at the side. Like I already told it doesn’t matter which way you make your first dc. The only thing to keep in mind is not to forget the chain stitch after this first dc. So if you use 3 chains as a starting dc, you have to make 4 chains in total. The starting dc in an a-row always falls at the side, so not front or back.
I put repeats in between brackets. So in this case the second(!) dc is a dc that is made behind color 2. For making reading easier I said here that *(back, front)* has to be repeated 10 times. Actually the last dc in an a-row is also a dc that lies on the side. So this also is not on top or at the back. But instead of being ‘difficult’, I make the description as short as possible. So in this case the last time you do a ‘front’ is a side dc at the end. It could happen that with the description of the repeats it’s more easy to just call this last dc a ‘side st’. So this variation is also possible!
Row 1b, color 2
Written pattern
-
- row 1b – front:
-
- *(front, back)* 10x
For a b-row it doesn’t play a role how to position color 1, so that will not be in the descriptions of the b-rows. The b-rows also don’t have side dc’s that fall aside of the piece. So it’s always important if the first or last dc of a row is in front or at the back. So the description for a b-row is ‘shorter’.
Pattern charts


Here are the pattern charts for row 1b. Click on the pictures to see it in full. Compare it with the description, and see if you can match the written pattern with the chart. This way you learn to read the pattern chart if you don’t have a written version!
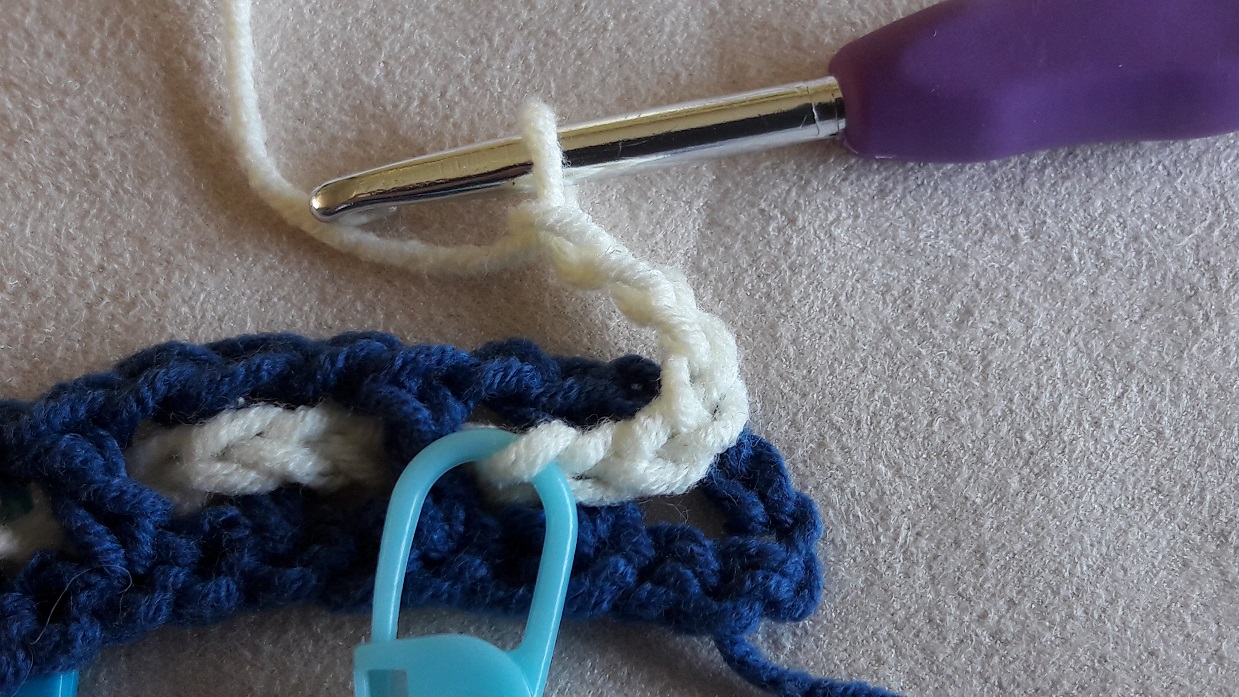
Start with the first dc. I start with doing 3 chains as a starting dc, and 1 in-between-chain. If you followed the instruction of the a-row correctly, then this will be correct right away. You see in the picture that this is laying on top of the upper side of the first square of row 1a. In the written pattern you also see that we start with ‘front’, so this is correct.
The second dc has to be behind color 1. We already marked the place where this dc has to be made with a stitch marker, so that makes life so much easier: you don’t need to count, because for this first stitch this is quite difficult. And in addition this dc has to be behind the 2nd square of row 1a.
You wrap the yarn around the hook once to start making the dc, but you have to insert your hook in such a way, that your stitch will be made on the backside. So pick up the loop from the back through the 2nd square to the front. I always use the curved top of the hook to pick up the loop (see the picture!) and bring it to the back. If the stitch marker is in the way too much, you can also bring it to the back first and pick up the loop there.
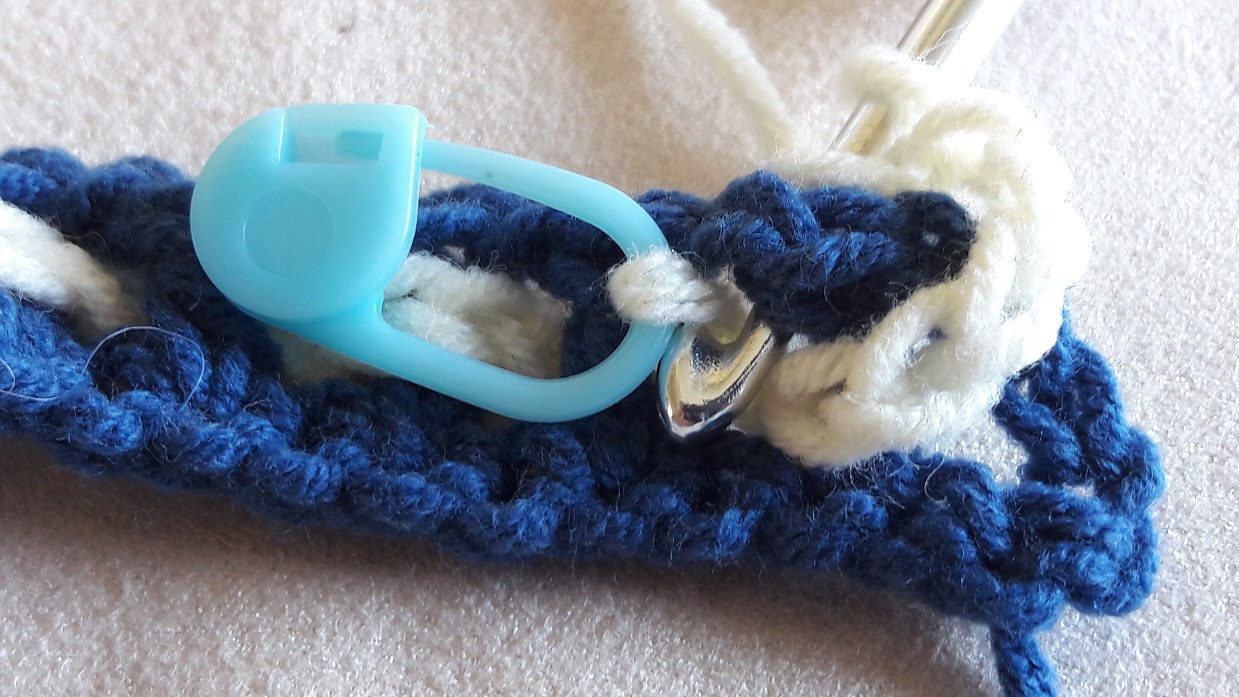
Here you see that the stitch is pulled to the back. You can now finish your dc as usual. You can fold the blue top part of row 1a to the front a bit, so that it’s not in the way.
You mustn’t work around the blue! You must keep the layers ‘separated’ from eachother. That’s the whole idea of interwoven or locking crochet, that the meshes are actually ‘loose’ from eachother, and the posts of the dc’s take care of the ‘weaving’.
Here you can see how it looks when the second dc is made. You have made the first square of color 2 now and the dc falls behind the 2nd square of color 1. You can also see how the mesh of color 2 falls inside the mesh of color 1.
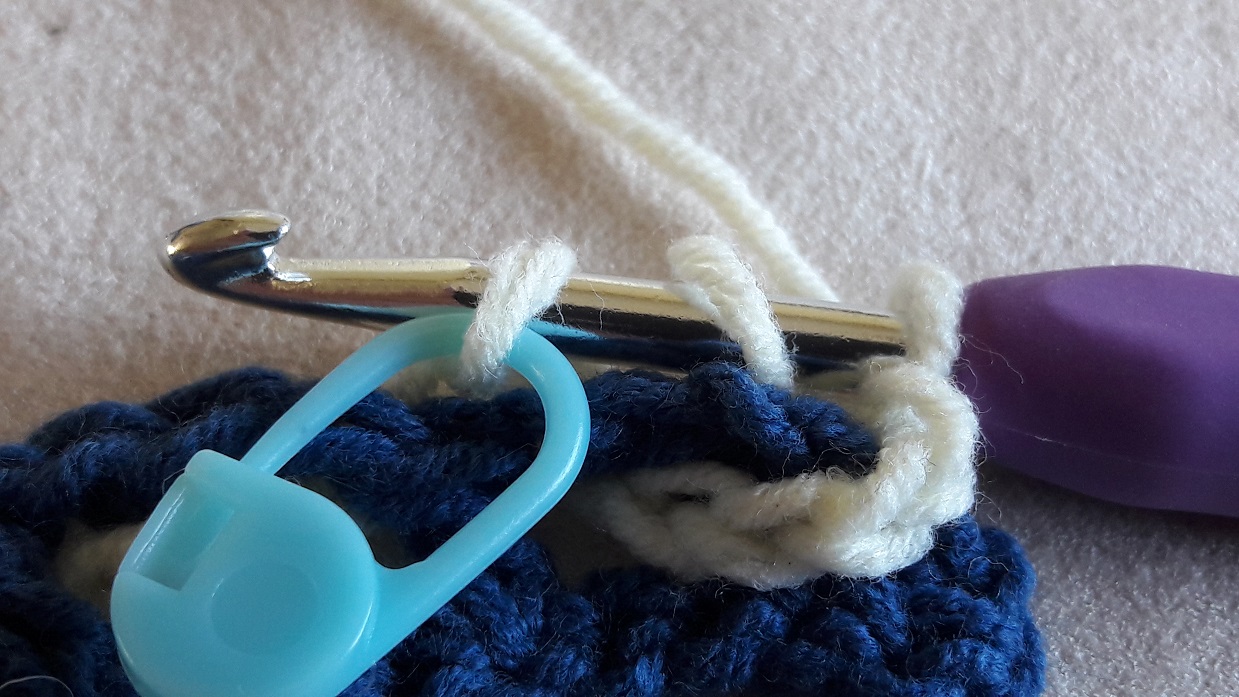
The next dc has to be at the front again.
First of all you mustn’t forget to do the chain stitch!
Secondly you have to look for where to insert you hook. This can be a bit difficult, because the last stitch is made at the back, so it’s a bit difficult to see in which loop it is made, which loop you have to skip next, and where to insert your hook in the loop after that! I solve this by pulling the chain row to the left a bit, so that you can see the place where the dc on the back is made a bit better, and so you can see which loop to skip and what loop to use for making your next dc.
Another thing you have to look at is that this stitch is on top of the 3rd square of color 1.
Now insert the hook into the loop, fold the blue part to the back so it’s out of the way, and finish your dc. You have now made the second square of color 2.
The next dc has to be in the back again. First make your chain!
Skip another stitch of the setup row, bring your hook from the back to the front through the 4th square, grab the loop, bring it to the back, fold the blue row to the front, and finish the dc on the back. You have now made the third square of color 2.
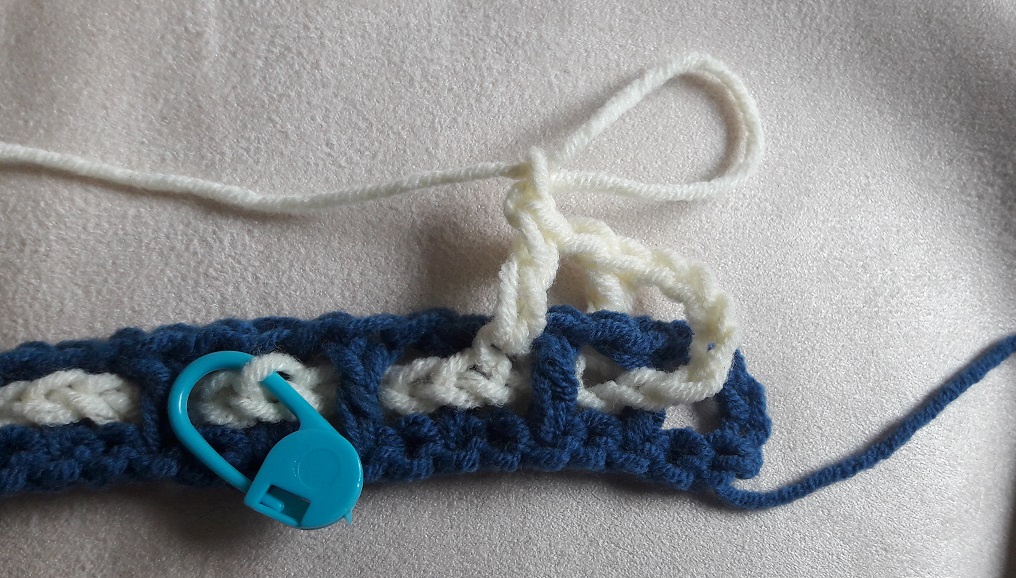
Checkpoint
Make another chain, and the next dc at the front. If you’ve done everything right, you will see that the last dc is made into the stitch before the stitch with the stitch marker. If this is not the case, and you ended up at the loop of the stitch marker itself, then most probably you skipped a loop too much (or too little) somewhere. Verify this, and correct it. It is really important that you have come to the right spot!
Your next check is that you have made 4(!) white squares. This is 1 less then when you came to your first checkpoint with the blue row, but this is correct, because the inner mesh will be 1 square smaller than the outer mesh.
And check if you’ve done your in-between-chains!
A tip!

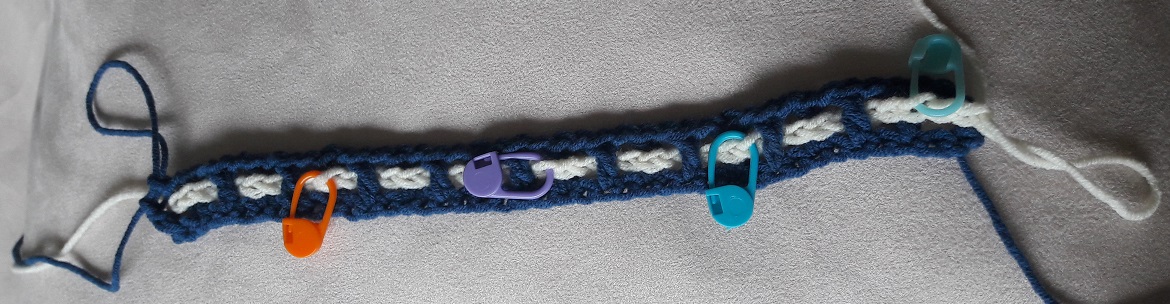
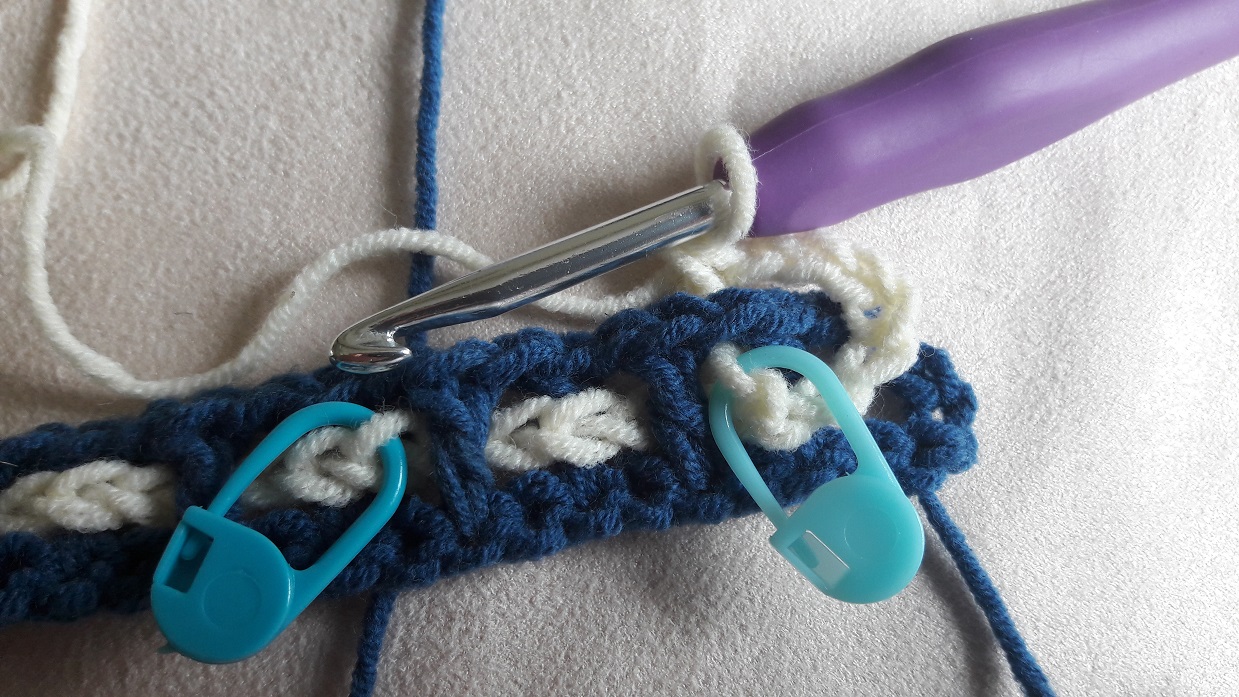
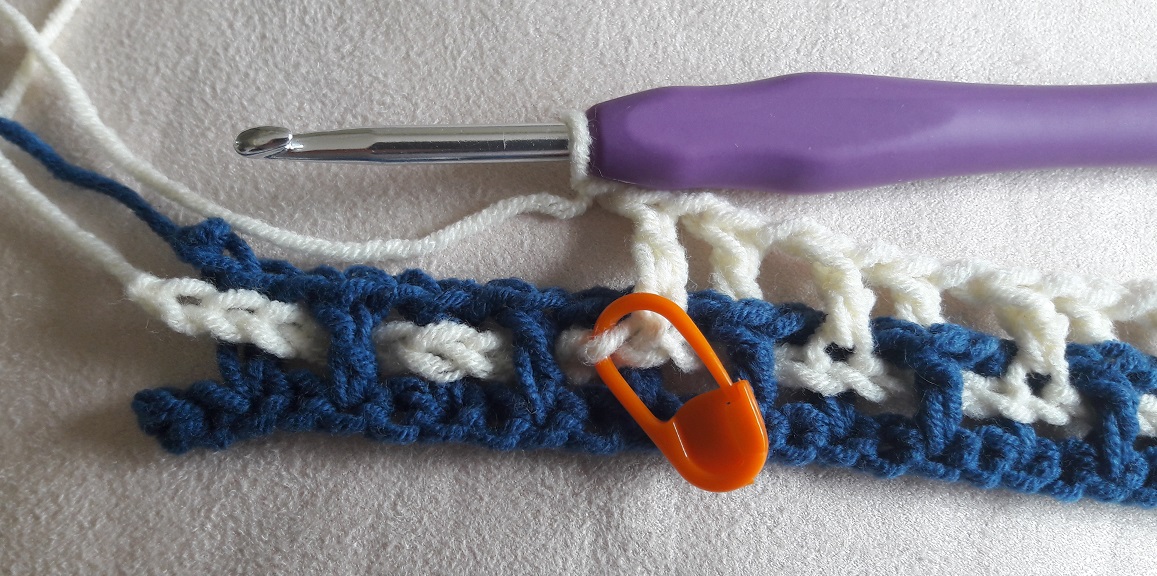
Of course you have to pay attention to the position of the white squares related to the position of the blue squares. Because of the shifting to the left and right of the white setup row, this can get shifted too. The first measure I usually take is to ‘attach’ the 2 rows to eachother at the start with a stitch marker. In the picture you can see that on the right at the light blue marker.
Of course you can just run over the row to see if you didn’t shift anything, but with this pattern it is quite easy to see if you’re still on the right path. I marked this in the picture. On both sides of the blue dc on the front you see a white dc: 1 left of the blue dc that’s at the front, 1 right of the blue dc that’s on the back. So you have a handy visual check!
Checkpoint
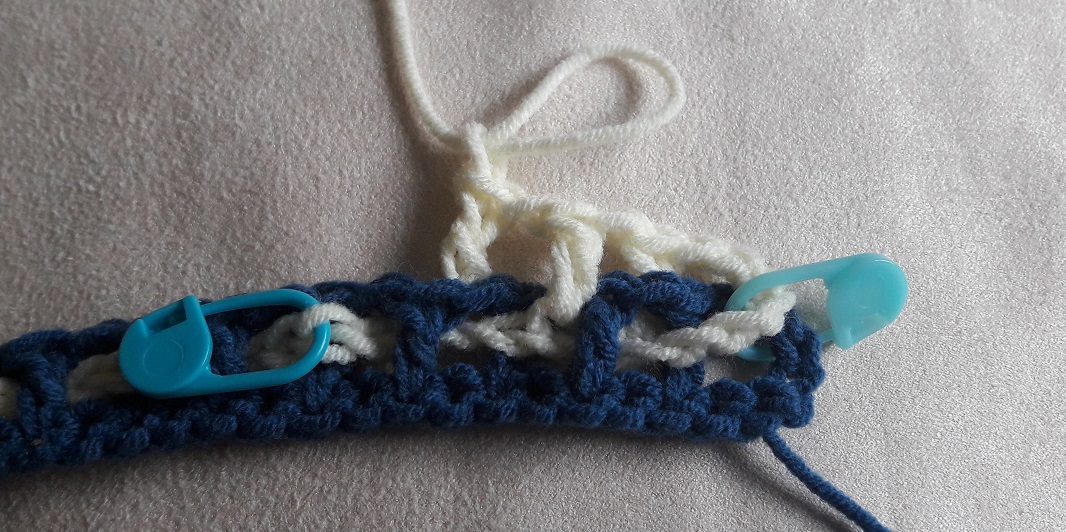
Continue until you’ve reached the next stitchmarker. If you’ve done this correctly your last dc is made again in the loop before the stitchmarker. Correct this if this is not the case.
Count the squares: it should be 9 now. With each next stitchmarker you will get 5 more squares! Check if you’ve made your in-between-chains, and check if the placement of the white squares is correct related to the blue squares.
Checkpoint
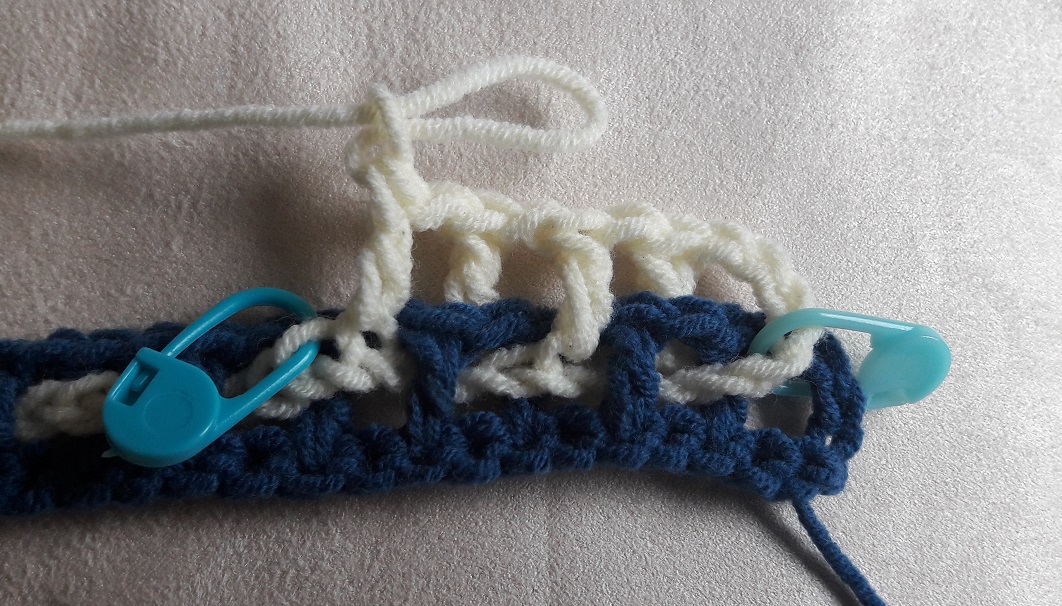
Continue until you’ve reached the next stitchmarker. If you’ve done this correctly your last dc is made again in the loop before the stitchmarker. Correct this if this is not the case.
Count the squares: it should be 14 now. Check if you’ve made your in-between-chains, and check if the placement of the white squares is correct related to the blue squares.

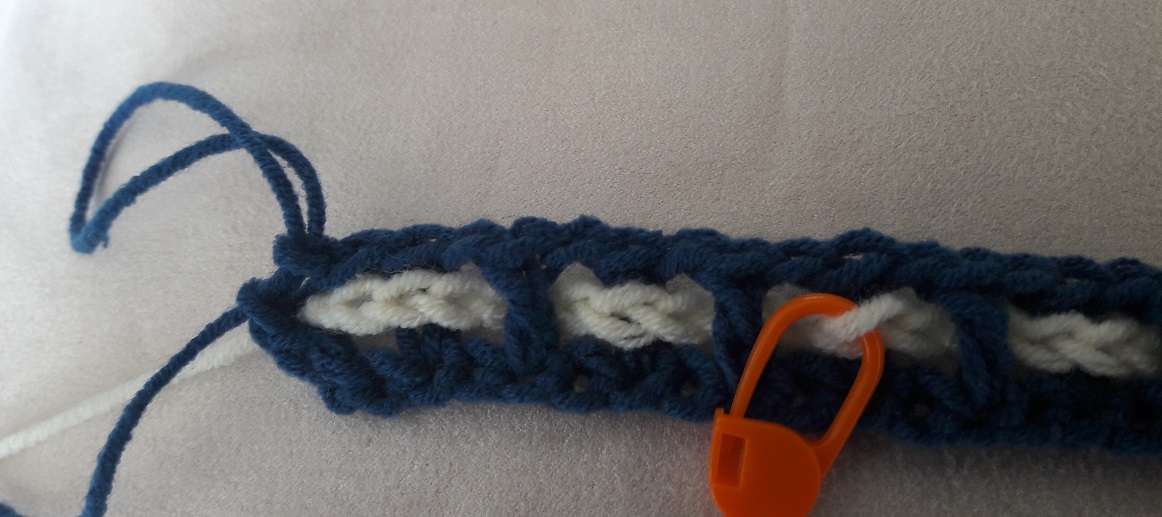
And do yourself a favor: put a stitch marker in the blue loop (see the picture at the red circle), so you won’t pull out the stitches like it happened to me 🙂
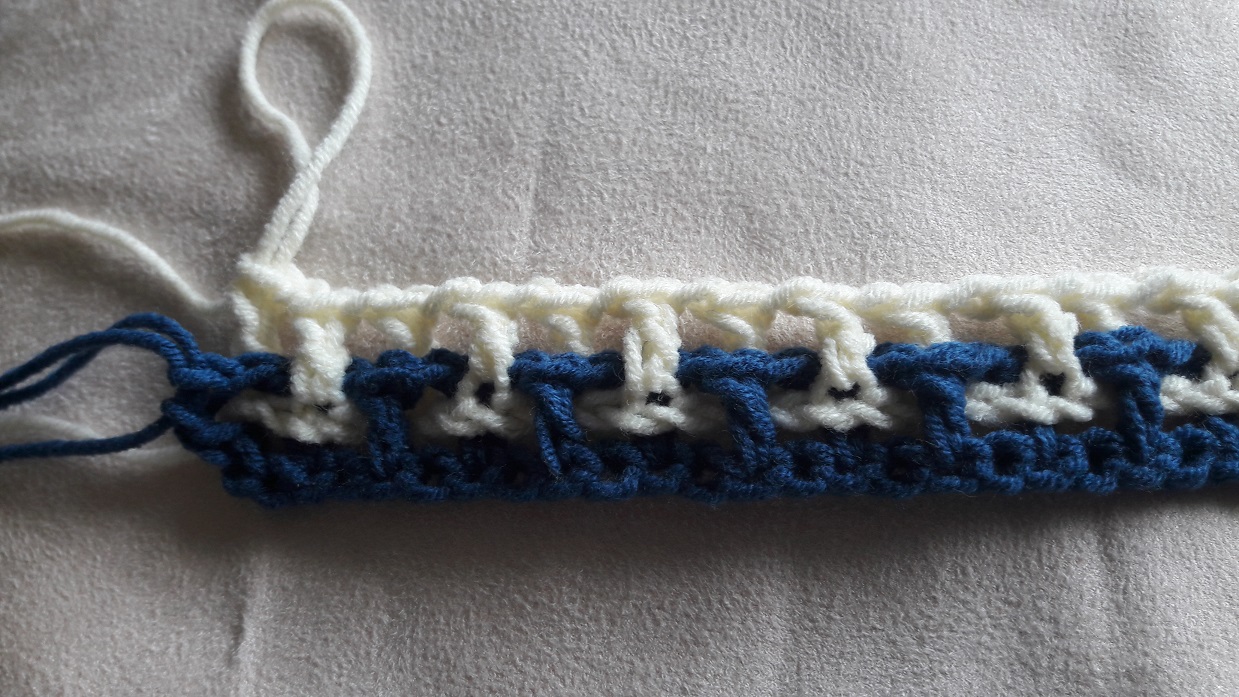
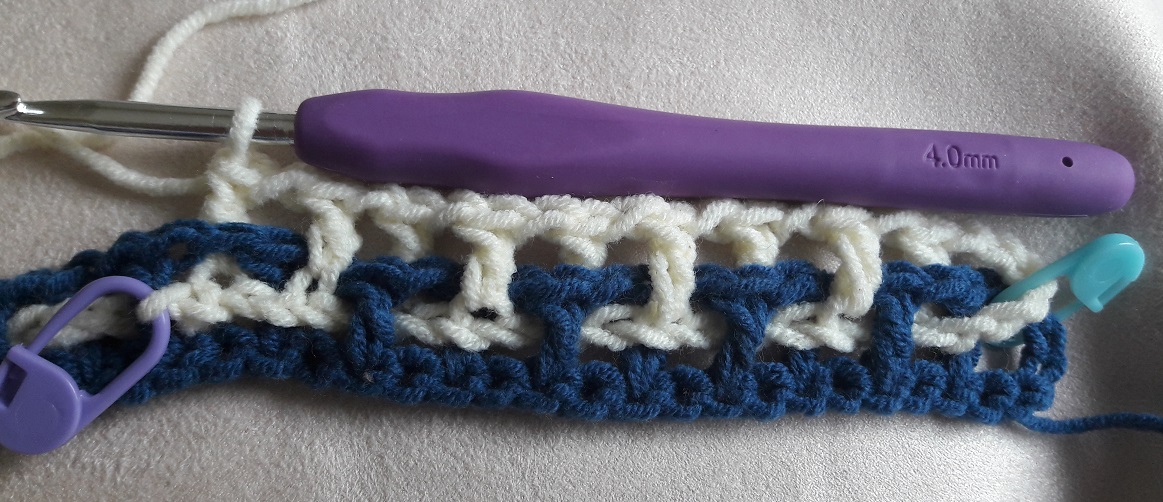
Now continue until the end of the row. If you’ve done everything correctly your last dc is made in the last loop of the setup row.
Count the squares: it should be 19 now. Check if you’ve made your in-between-chains, and check if the placement of the white squares is correct related to the blue squares.
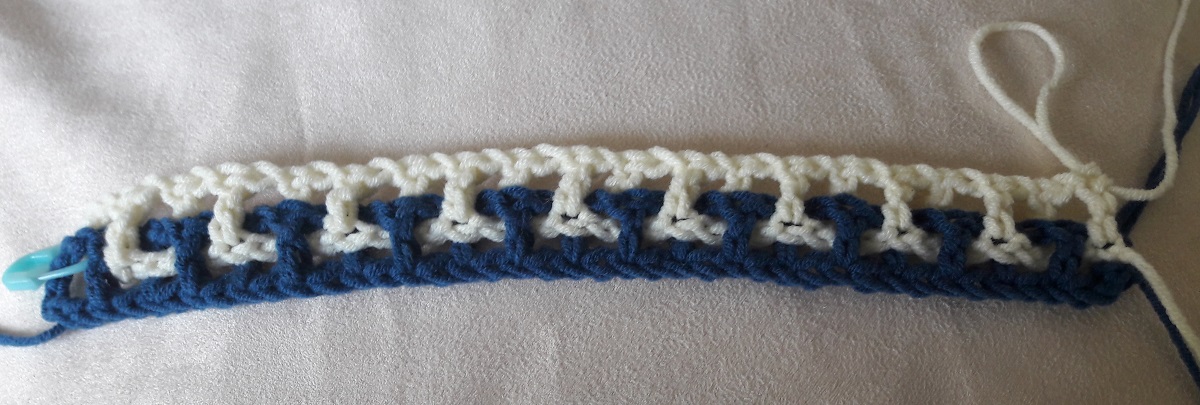
Finished! If you’ve done this, you have managed the hardest part. From now on it will be much easier! Really, lots and lots easier! So bite through this setup, and follow the instructions carefully if it didn’t go right the first time. It really is a matter of getting used to it. Later with the blanket we will do the setup slightly different, but it is very much the same! Believe me, you will get used to it, and before you know it you can do this quite fast!
Another tip!
Always check your work at the back also. I don’t know how it works, but it happened to me a couple of times that I noticed a mistake quicker on the backside than on the front side. This probably has to do with colors and patterns that are clearer on one side compared to to the other side, but it’s handy to check both sides. Sometimes it also is more visible if you accidentally worked around the previous row, so that the meshes are crocheted to eachother. This sometimes happens, and that’s not a big isssue, you will notice soon enough. If you will start working faster, what will happen for sure after this, you will make an occasional mistake. Just correct it when you see it….
Row 2 of the practice piece
Click here to go to the page with the tutorial for row 2