
This is a design for a little bag, to put pencils or make-up in, or for whatever you would like to use it for. It doesn’t have a zipper yet on this photo, but you can add that for a closure or make a closure with small buttons for example. I did some blogging on this website about the entire design process (see here for the start), and about the steps making this (see here for the start). I’m also going to have some video’s on my YouTube channel, in which I am going to show you every step, from start to end, how to make this little bag. Please wait for them for a little while, they are already recorded, but they need to be edited. I will update this page the moment they are life!
This design is worked in the round. The pattern here is just a part of the whole. You can repeat it as many times as you like. I did a repeat of 8 times, and it is 22.5 cm wide per side. I stopped knotting at a depth of 11.5 cm. I used cotton for crochet or knitting, because doing this with embroidery floss, well…. it would be just a bit too much for me 🙂
Well, before continuing… you see 2 designs here. The original design I drew first, and the design I ended up with as you can see in the picture of my bag. You can choose which you like more. Just check for the usage of the purple yarn below, because you really need more for making the original design. You can read in my blogs why I changed it along the way.

![]() Click on the pictures for a full size version of the designs!
Click on the pictures for a full size version of the designs!
Used colors:
Dark purple; Blue; Orange; Dark pink; Light pink; Dark green; Light green; Yellow; Red.
Usage:
For the strands for the upper border I used 4 strands of 30 inch long. Use whatever colors you want.
I used about 2 yards for every 2 strands of a color in the pattern. You will fold them over, so they will end up being 1 yard per working thread. So, for the blue block on the left top side you need 2(!) threads of 2 yards long. Take 3 yards for each 2 purple threads if you want to knot the original version of the design where the zigzag borders continue all the way down, because the zigzags use more length. I had quite some length left, as you can see in my blog (here) where I tell about how to finish this piece, but that was because I thought the bag was deep enough for what I had in mind.
Description:
The designs show you 2 zigzag borders, one on the left and one on the right. The border on the right is the border for a next repeat. So the first purple thread of the group of 4 purple threads on the right is the start of a new repeat. I also used grey on the left and the rigth of the pattern. This is because you are not obliged to do each pattern repeat with the same colors, or the same color order. You can make each repeat completely different if you would like to. So I kind of left this open for you to interpret. If you are just going to repeat the pattern like charted here, and like I did as you can see in the picture of my bag, you can replace the grey lines and blocks in the first diamond on the top right by orange, like on the left top side. If this is not completely clear to you (I always hope my explaining is enough, but okay, I could fail on that part 🙂 ), you can always watch the video’s!
 You start this bag with folding each yarn over end tie them around the upper border threads. Look at the pattern in which order the threads have to be tied: 2 purple threads, 1 blue, 1 orange, 1 blue, 1 orange, 1 light pink, 1 dark pink, and so on. I prefer to tie them in a way so that the little horizontal ‘line’ shows just below the border threads. Well, it doesn’t matter how you do this, it’s a matter of personal preference, but use the same way of tieing consequently.
The first row you will be knotting is quite important, because you have to bring the threads to the right position for knotting the rest of the design. If you are not familiar with how to do this, you can look at the photo tutorials on this website on how to do the basic knots.
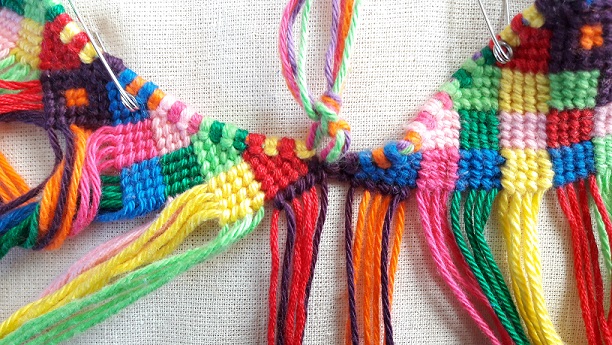
Now, before you go working in the round, wait for just a little bit. First do some knotting of the pattern as if you just work flat. This will make that you get a correct spacing. You could easily slide the threads together too much after tieing them around the border threads. Knotting the design for a couple of rows is preventing that. But, pay attention that you don’t use the left threads that have to be tied to the threads on the right when closing your work to a circle! Work in a V-shape, like you can see in the following picture.
The rest is just following the pattern. After doing some knotting you can bring the sides together, and just pretend that the pattern just continues, like there is no left and rigth side. Well, there isn’t actually 🙂
In my video’s I show you what order I like to work in, how to do the zigzag borders and the straight purple line. So watch them if you need some guidance (when they are there 🙂 ). And you can also read my blogs of course.
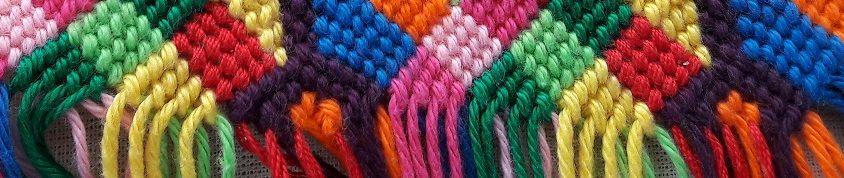
When you decided the bag is deep enough for what you want to use it for, end with making the lower border knots in a straight line. I made half colored blocks as you can see in this detail picture.
Fold your work over on the place where you want it to be, and tie each thread from the front side to a thread on the back side. Do this for each thread, and in the rigth order, so your bag will not get skewed. After that you can finish the bag with fringes or braids. I made quite long braids, because I love them and always think they kind of go with this kind of knotting. But, again, if you would like twisted cords for example, please do so!
Well, hope you enjoy making this. Leave a comment if you like, or if you have questions! Have fun!