Index
- Part 1, Intro and making central pattern wider: that’s this page
- Part 2, Making the central pattern smaller: click here to go to that page
- Part 3, Widen the borders: click here to go to that page
Adapting the HAL CAL pattern: can it be done?
I received the question of a couple of people if the pattern of the Hooked and Locked CAL could be made wider or smaller. At the introduction I said that you should keep to the number of stitches, because the pattern parts are made for that. But of course you can adapt it. It’s just not that I can say only one time: add or subtract a specific number of stitches, and add or leave out a couple of repeats. That’s because several patterns have a different number of stitches per repeat.
It will also be something that you have to figure out yourself. So this means that with each pattern you have to look at it again.
Leaving the design intact
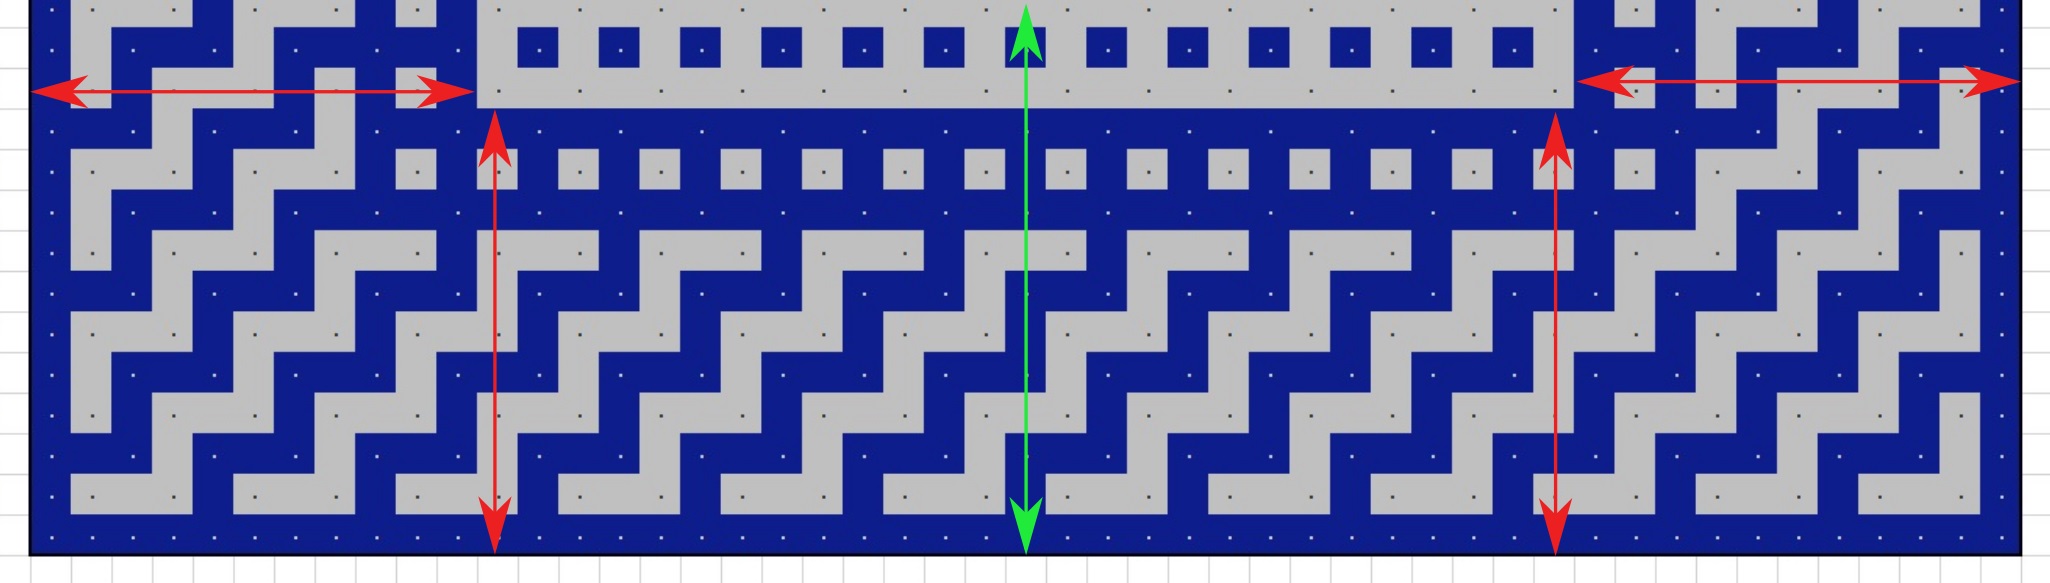
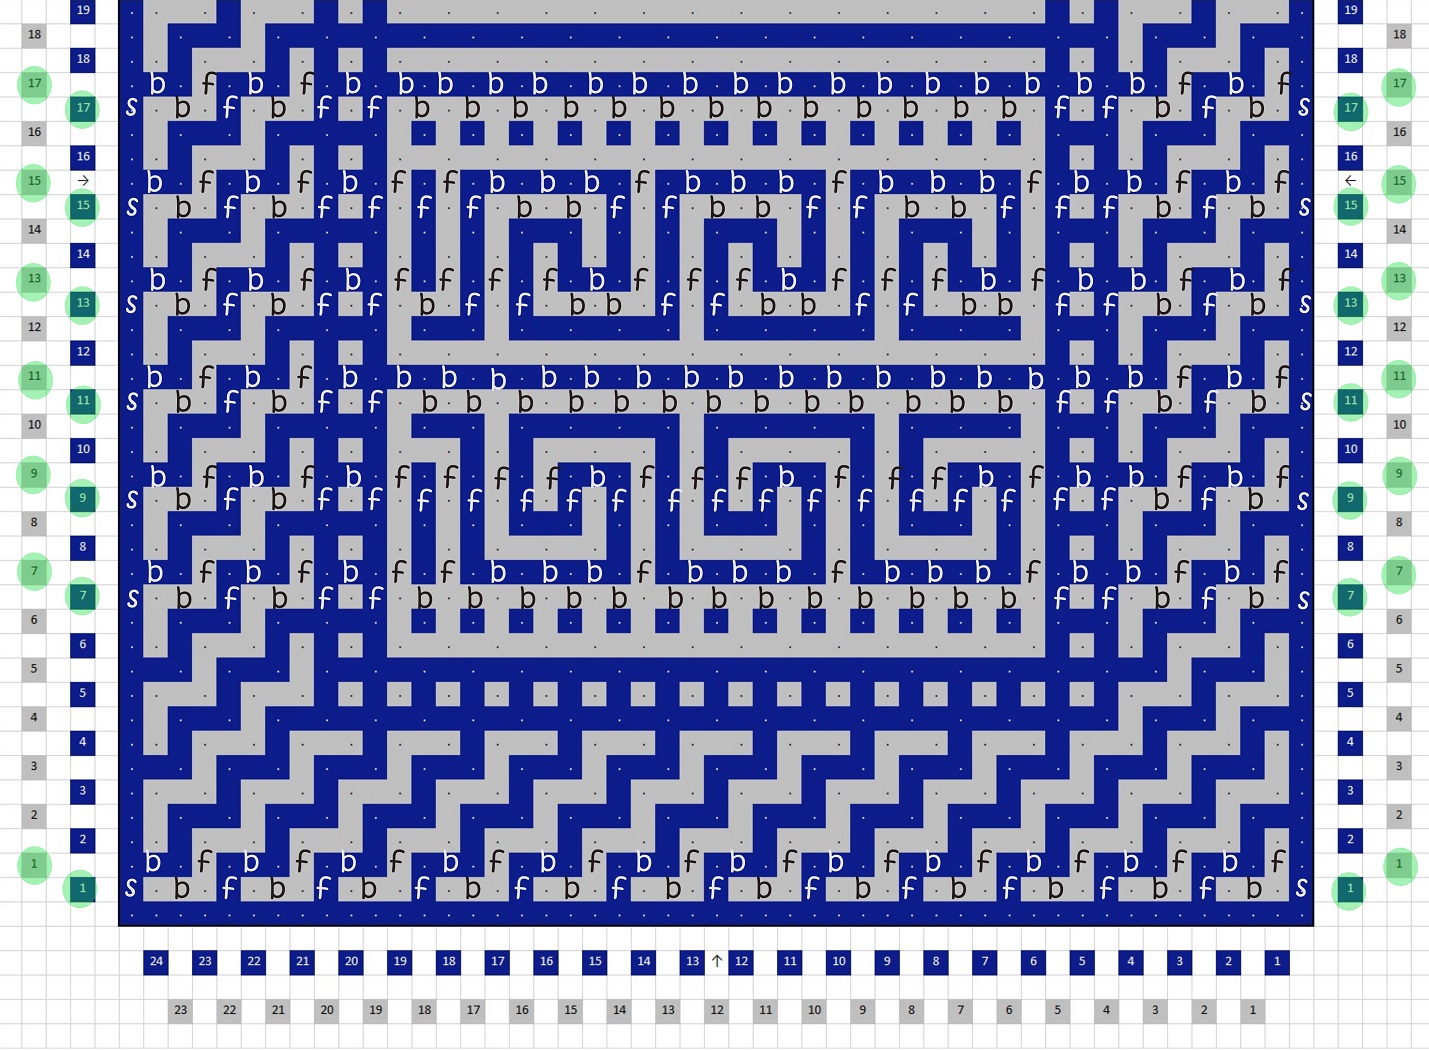
While designing I had an image in mind how I wanted this blanket to look. One of the important things is that I wanted to have a border around it where the stairs-pattern would repeat in a consistent way. These borders are equally high and wide on all sides. You can see that at the red arrows in the chart here. Further I kept the patterns centered most of the times. See the green arrow. This is not done for the first 2 patterns, but they have a short and quick repeat, so that didn’t bother me.
So if you want to leave the design intact, you will have to keep these 2 principles in mind. The instructions after this assume you want that.
What will I teach you here?
Before I start explaining, I will repeat here what I said at the tutorial about reading the charts. Look at that also (click here to go to that page). This is a course, so take your time for it.
So in this special I will dive into making alterations yourself. It is specificly focused on the HAL CAL pattern. I will do this with pattern charts, but also with written directions, so that everyone can choose the way she or he prefers. I will tell about making it wider and smaller, while leaving the sides intact, and widening the sides (and the accompanying bottom and upper border).
I will give you the small pictures on this page again, which you will have to click on to see the full picture. You can store that on your computer or mobile device and print it if you want. It is best though to look at this on your computer, it will be hard on mobile. And first look through it quite globally until the end, so that you will see all the available materials. Don’t let the length of the texts intimidate you. I’ve added practicing paper, the worked out pattern charts, whatever I could think of. Print them, so you can keep it next to the texts if you really dive into it.
I used these abbreviations: s for side stitch, f for front, b for back.
The base
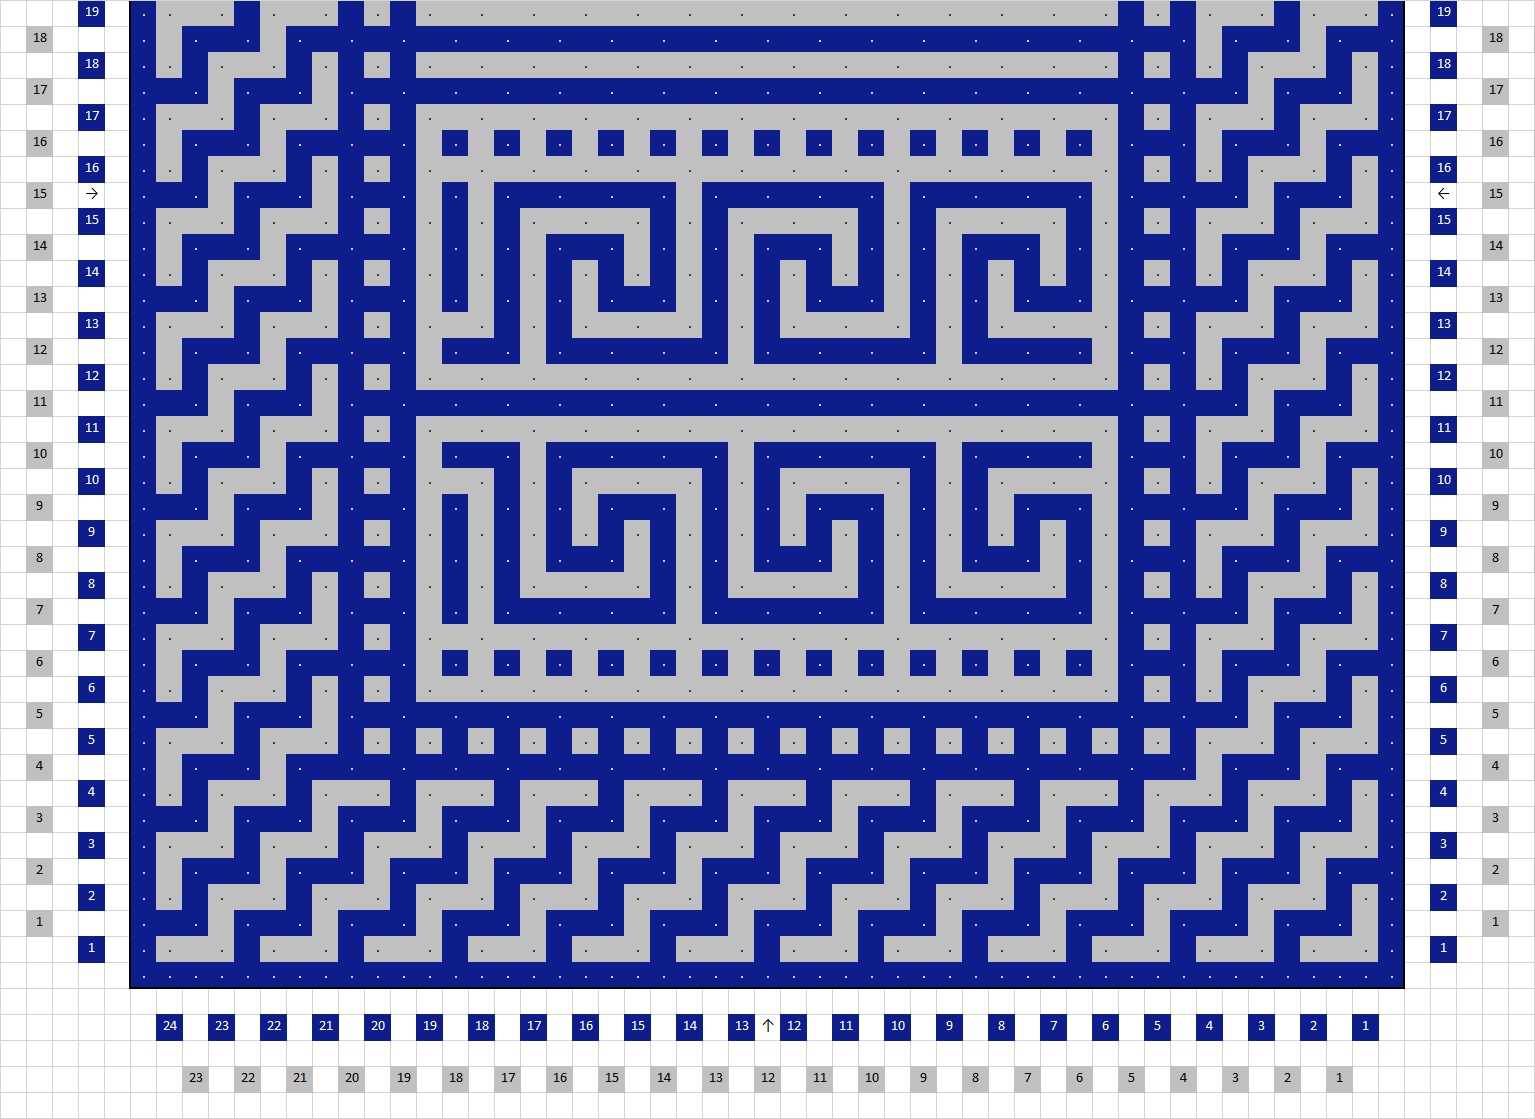
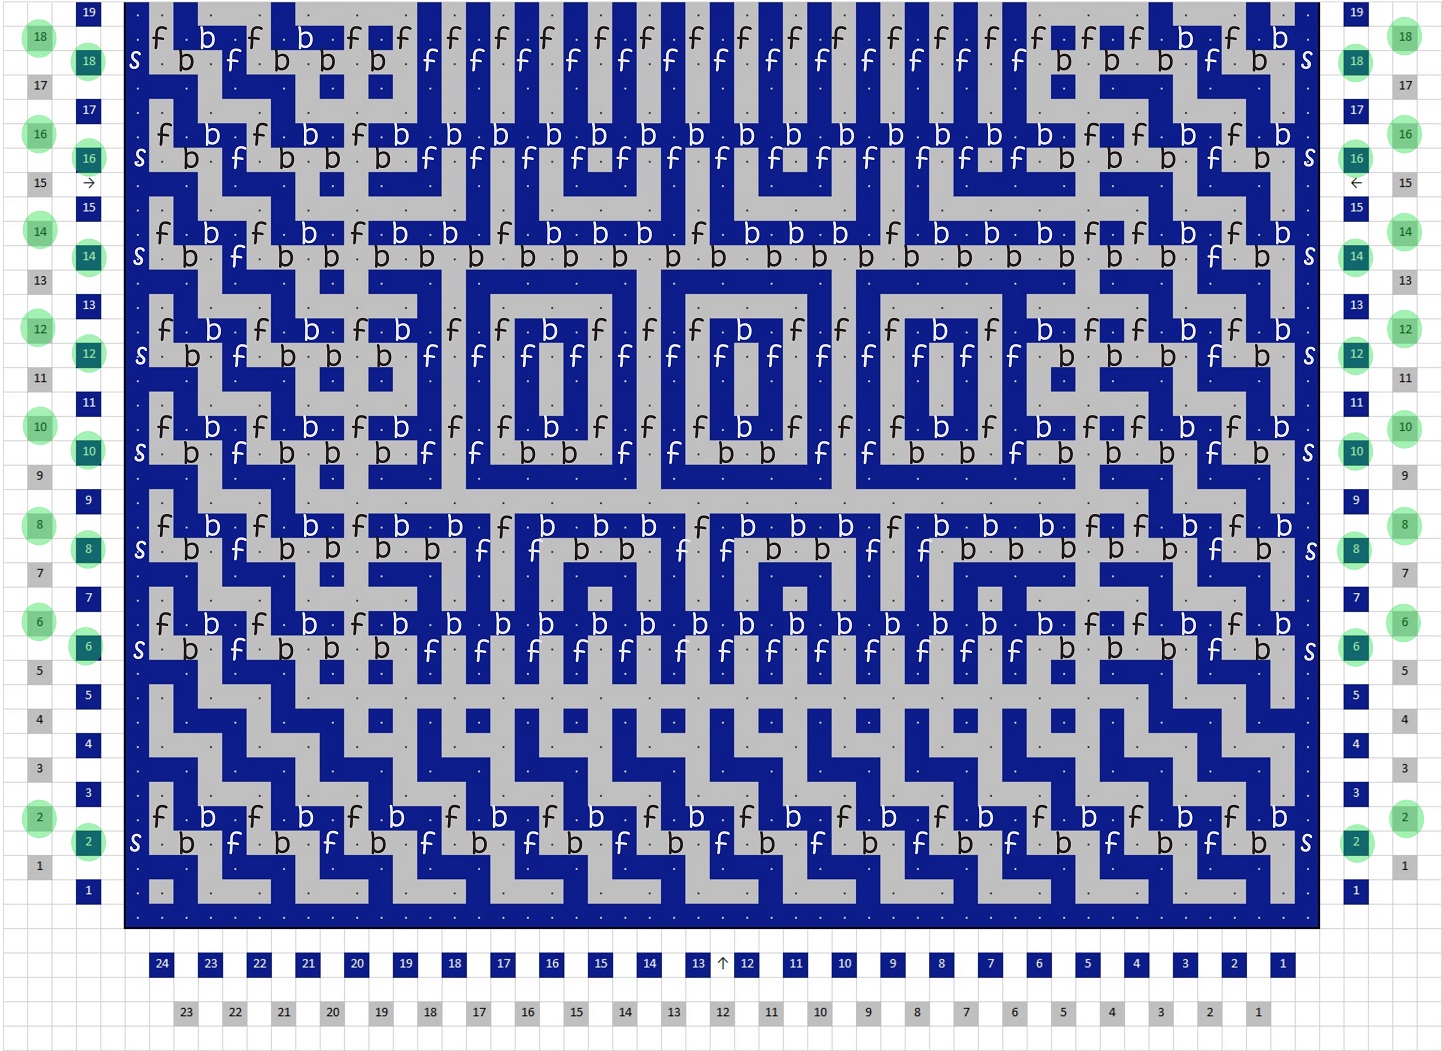
I show here a pattern that uses the same border as with the HAL CAL. The middle pattern is a meander. I also added some rows with stripes,so that you can see the effects of them in even and odd rows. It maybe is a bit mean, but this pattern is not mirrored or centered. I did that on purpose for this tutorial…..
The base pattern is 24 squares wide. We will take pieces out of it and add pieces to it.
Keep in mind already:
- The first and last 6 stitches of a row are ‘fixed’ for the pattern if you want to make the central pattern wider or smaller.
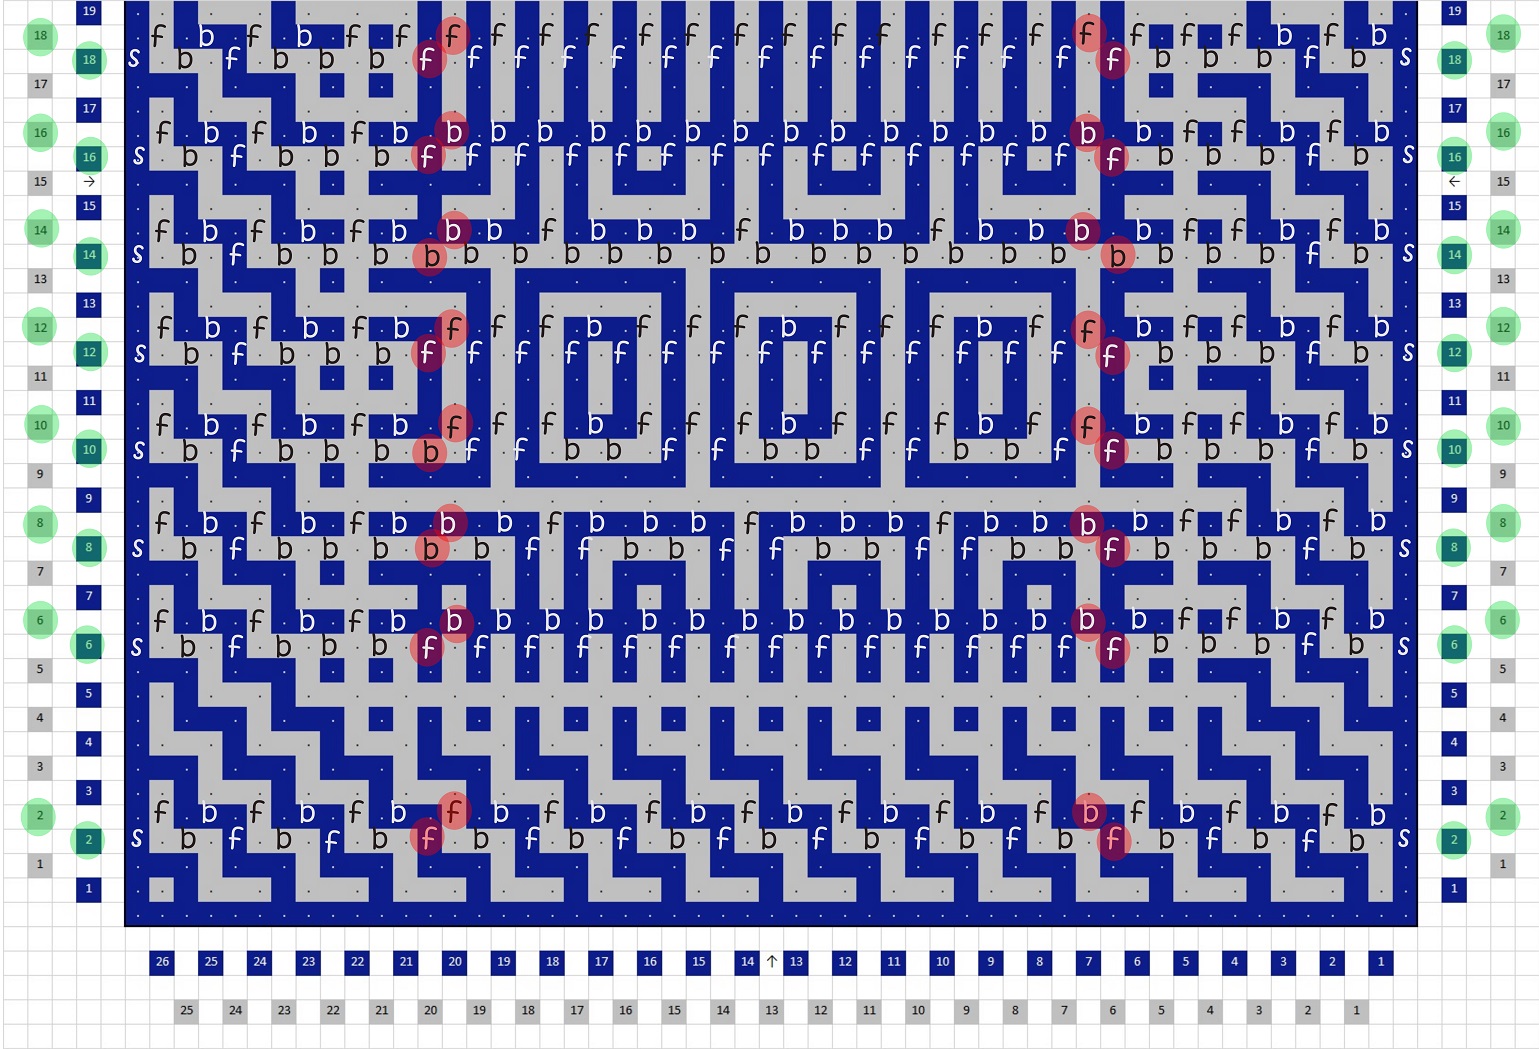
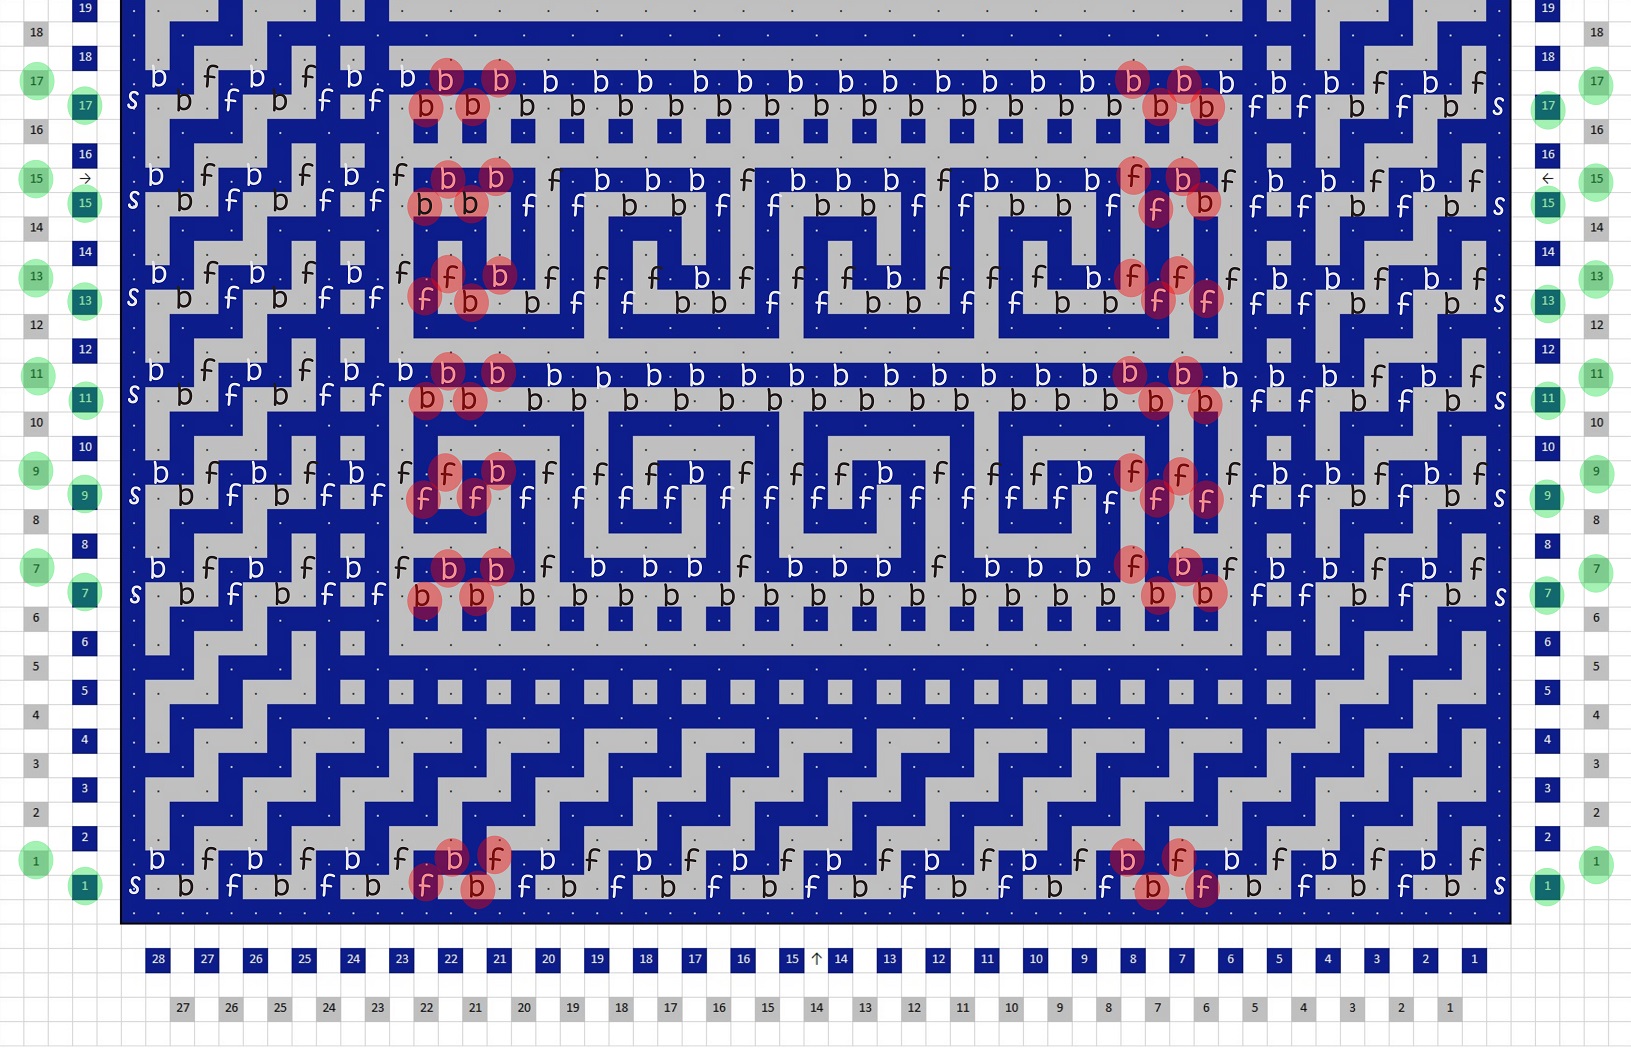
- To keep the middle pattern centered you will have to add or remove a multiple of 2 squares, 1 left and 1 right of the centre, immediately at the inside of the borders.
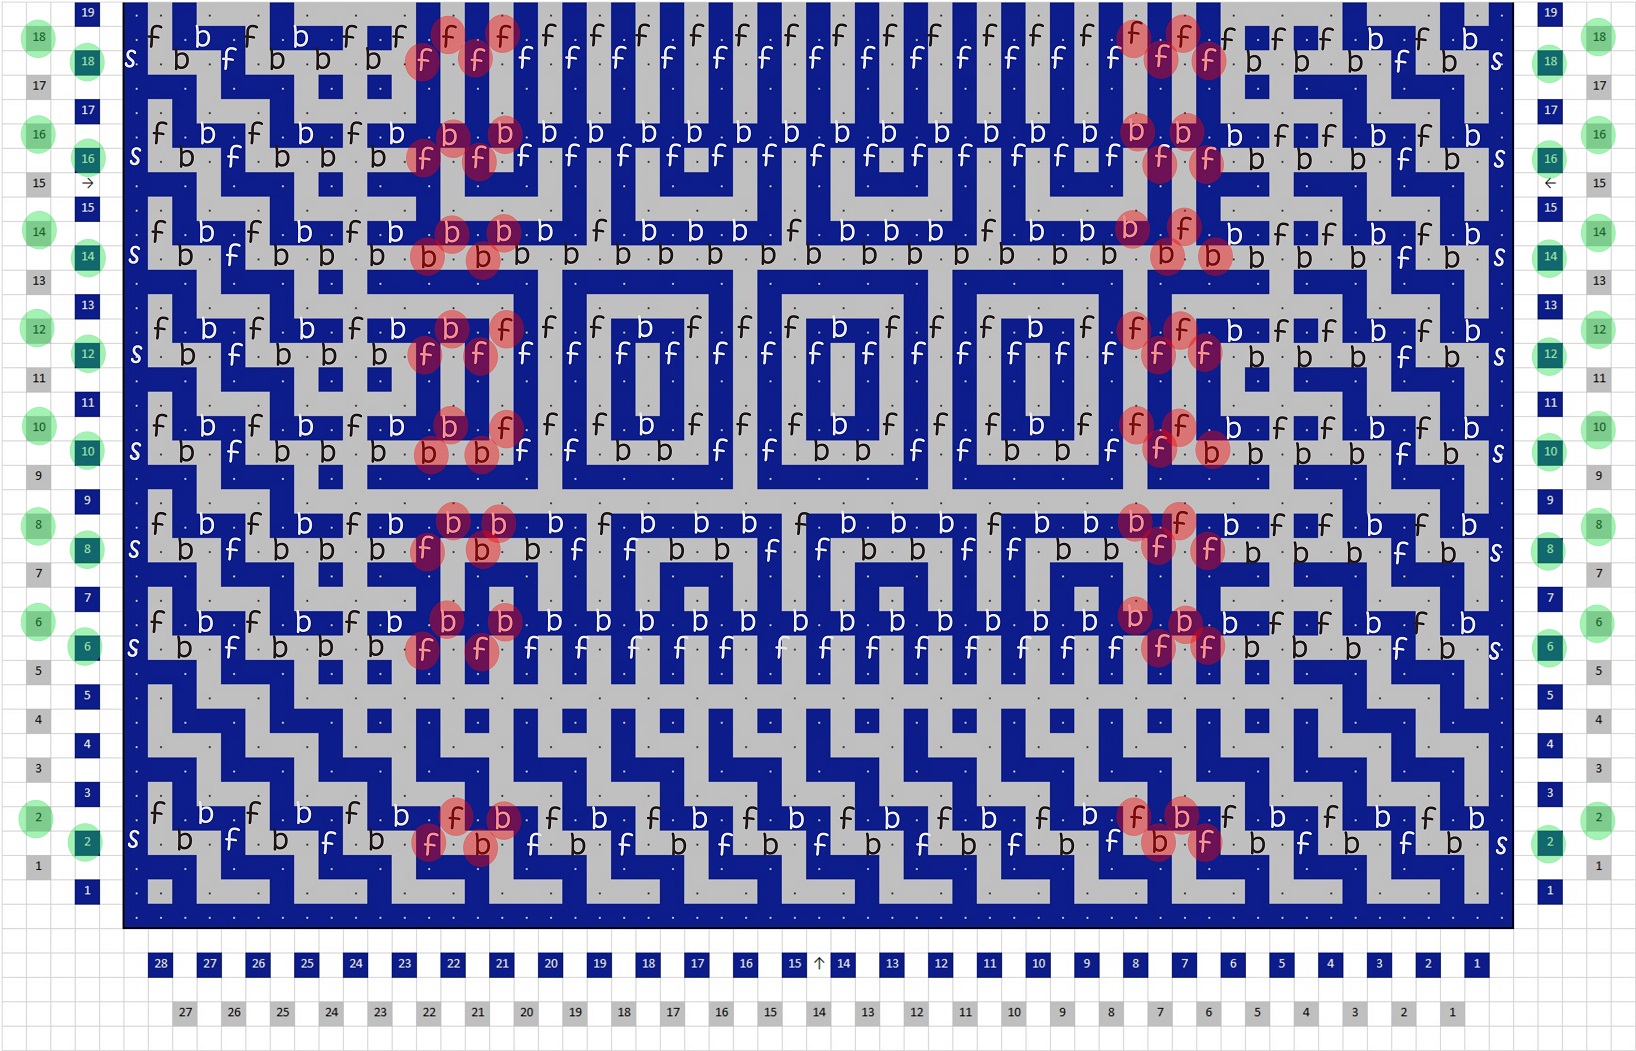
- I circled the new stitches in red.
- See the chart reading tutorial: the stitches in the pattern charts are read from right to left, like you crochet (for righthanded persons). The written description is actually backward: you start with writing down the most right stitch first at the left, and so on, so keep that in mind!
Adding squares to the central part
Excerpt
So you will have that already 😀 😀 😀 . Leave the first and last 6 stitches intact, and adapt the middle part in such a way the pattern is still correct. But I will give you the elaborated version after this anyway 🙂 .
The odd rows in the bottom border


Written patterns 1a-rows:
- base row 1a: s, *(b, f)* 11x, b, s (24 squares, 25 double crochets)
- 2 squares added: s, *(b, f)* 12x, b, s (26 squares, 27 double crochets)
- 4 squares added: s, *(b, f)* 13x, b, s (28 squares, 29 double crochets)
Written patterns 1b-rows:
- base row 1b: *(f, b)* 12x (23 squares, 24 double crochets)
- 2 squares added: *(f, b)* 13x (25 squares, 26 double crochets)
- 4 squares added: *(f, b)* 14x (27 squares, 28 double crochets)
This is not very exciting yet. With each 2 squares you add you will get an extra repeat of f and b.
The even rows in the bottom border


Written patterns 2a-rows:
- base row 2a: s, *(b, f)* 11x, b, s (24 squares, 25 double crochets)
- 2 squares added: s, *(b, f)* 12x, b, s (26 squares, 27 double crochets)
- 4 squares added: s, *(b, f)* 13x, b, s (28 squares, 29 double crochets)
Written patterns 2b-rows:
- base row 2b: *(b,f)* 12x (23 squares, 24 double crochets)
- 2 squares added: *(b, f)* 13x (25 squares, 26 double crochets)
- 4 squares added: *(b, f)* 14x (27 squares, 28 double crochets)
This is also not very exciting yet. With each 2 squares you add you will get an extra repeat of f and b.
The odd rows above the bottom border: rows 7


Written patterns 7a-rows:
- base row 7a: s, b, f, b, f 2x, b 13x, f 2x, b, f, b, s (25 double crochets)
- 2 squares added: s, b, f, b, f 2x, b 15x, f 2x, b, f, b, s (27 double crochets)
- 4 squares added: s, b, f, b, f 2x, b 17x, f 2x, b, f, b, s (29 double crochets)
This is also not very exciting yet, because the repeat inside the borders consists of b (back) only. You can see here already that the first and last 6 stitches are the same each time.
Written patterns 7b-rows:
- base row 7b: f, b, f, b 2x, f ,*(b 3x, f 1x)* 3x, *(f, b)* 3x (24 double crochets)
- 2 squares added: f, b, f, b 2x, f 2x ,*(b 3x, f 1x)* 3x, b, *(f, b)* 3x (26 double crochets)
- 4 squares added: f, b, f, b 2x, f , b, f, *(b 3x, f 1x)* 3x, b 2x, *(f, b)* 3x (28 double crochets)
The repeat is here in the bbbfbbbfbbbf. It could also have been fbbbfbbbfbbb of course, it’s just a matter of what you take as the start of your repeat. If I would have chosen the second variation, then the written directions of base row 7b would have looked like this: f, b, f, b 2x, *(f 1x, b 3x)* 3x, f 2x, *(b, f)* 2x, b. I’ve also written the end a bit differently, to show you that the written directions do not always start or end with these 6 border stitches. Just count it: f, b, f, b 2x = 5 stitches at the start, f 2x, *(b, f)* 2x, b = 7 stitches. So pay attention to that.
So let’s take this second version: f, b, f, b 2x, *(f 1x, b 3x)* 3x, f 2x, *(b, f)* 2x, b. This is to show you how to handle this if it’s not that obvious how to solve this.
- Step 1 is to detect the first 6 stitches (the right border). If the repeat already starts before you’ve gotten to the 6 stitches, like here, first write it down as following: f, b, f, b, b, f, b, b, b. You take the first repeat with it. The first 5 in blue, plus the first in yellow makes the first 6 border stitches: f, b, f, b, b, f, b, b, b.
- If you have to add stitches to this, then it has to be done after the 6 border stitches, so before the 3 b’s. So if you add 1 stitch to this, an f will be added in this case, so that the pattern after that gets to it’s repeat: f, b, f, b, b, f, f, b, b, b. These last 4 stitches are fbbb. If you have to add 2 stitches, it will be f, b, f, b, b, f, b, f, b, b, b. 3 Stitches f, b, f, b, b, f, b, b, f, b, b, b. 4 Stitches f, b, f, b, b, f, b, b, b, f, b, b, b. 5 Stitches f, b, f, b, b, f, f, b, b, b, f, b, b, b. And so on.
- Detect the last 6 stitches now (the left border). We have here 7 stitches after the pattern: f 2x, *(b, f)* 2x, b. This is f, f, b, f, b, f, b. So the first f is actually part of the repeating pattern.
- If you have to add stitches to this, then is has to be done before the 6 border stitches, so after the first yellow f. So if you add 1 stitch to this on this side, a b will be added in this case, so that the pattern gets to it’s repeat: f, b, f, b, f, b, f, b. If you have to add 2 stitches, it will be f, b, b, f, b, f, b, f, b. 3 Stitches f, b, b, b, f, b, f, b, f, b. 4 Stitches f, b, b, b, f, f, b, f, b, f, b. 5 Stitches f, b, b, b, f, b, f, b, f, b, f, b.
Tip: I can image that the above is quite mind-boggling. But just take a notepad with squares, and write down the pattern on it.
Of ocurse you will not do this for all 241 or 240 double crochets, but just do the sides and 1 or more repeats, depending on how many you want to be certain you will do it right.
Do the above with this practice paper. Pay attention, it is ‘drawn’ like on the chart, so backward to the written pattern. In the upper row is the original pattern, in the row after that 1 stitch on each side is added, in the row after that 2 stitches on each side, and so on.
You can do this same drill for the other rows. At the end of this page I give all full charts, so look at that if you need that.
The even rows above the bottom border : row 8a


This is an a-row , with a side stitch. It doesn’t make a difference actually, because it’s just a stitch, but then you will have seen that also, and we have a slightly different pattern repeat here. Still a very simple one though.
Written patterns 8a-rows::
- base row 8a: s, b, f, b 5x, *(f 2x, b 2x)* 3x, b 2x, f, b, s (25 double crochets)
- 2 squares added: s, b, f, b 3x, f, *(b 2x, f 2x)* 3x, b 5x, f, b, s (27 double crochets)
- 4 squares added: s, b, f, b 3x, *(f 2x, b 2x)* 4x, f, b 3x, f, b, s (29 double crochets)
You see that I really shuffled with these directions. But actually you just do the same as with row 7b.
The repeat is here in the ffbbffbbffbb. In the description of ‘2 squares added’ you can see I turned it around: bbffbbffbbff.
- Stap 1 is detecting the first 6 stitches (the right border). Write it down first like this: s, b, f, b, b, b, b, b. When you split this up in 6 border stitches and the rest, it’s: s, b, f, b, b, b, b, b.
- If you will add stitches to this, this must be done after the 6 border stitches, so before the 2 yellow b’s. So if you add 1 stitch to this on this side, an f will be added, so that the pattern follows the correct repeat: s, b, f, b, b, b, f, b, b. If you have to add 2 stitches, it will be s, b, f, b, b, b, f, f, b, b. 3 Stitches s, b, f, b, b, b, b, f, f, b, b. 4 Stitches s, b, f, b, b, b, b, b, f, f, b, b. 5 Stitches s, b, f, b, b, b, f, b, b, f, f, b, b. And so on.
- Detect the last 6 stitches now (the left border). We have only 5 stitches now after the pattern: b 2x, f, b, s. So you will add a repeat. This is f, f, b, b, b, b, f, b, s.
- If you have to add stitches to this, then is has to be done before the 6 border stitches, so after the last yellow b. So if you add 1 stitch to this on this side, a b will be added, so that the pattern gets to it’s repeat: f, f, b, b, b, b, b, f, b, s. If you have to add 2 stitches, it will be f, f, b, b, f, b, b, b, f, b, s. 3 Stitches f, f, b, b, f, f, b, b, b, f, b, s. 4 Stitches f, f, b, b, f, f, b, b, b, b, f, b, s. 5 Stitches f, f, b, b, f, f, b, b, b, b, b, f, b, s.
You can practice this again with this practice paper.
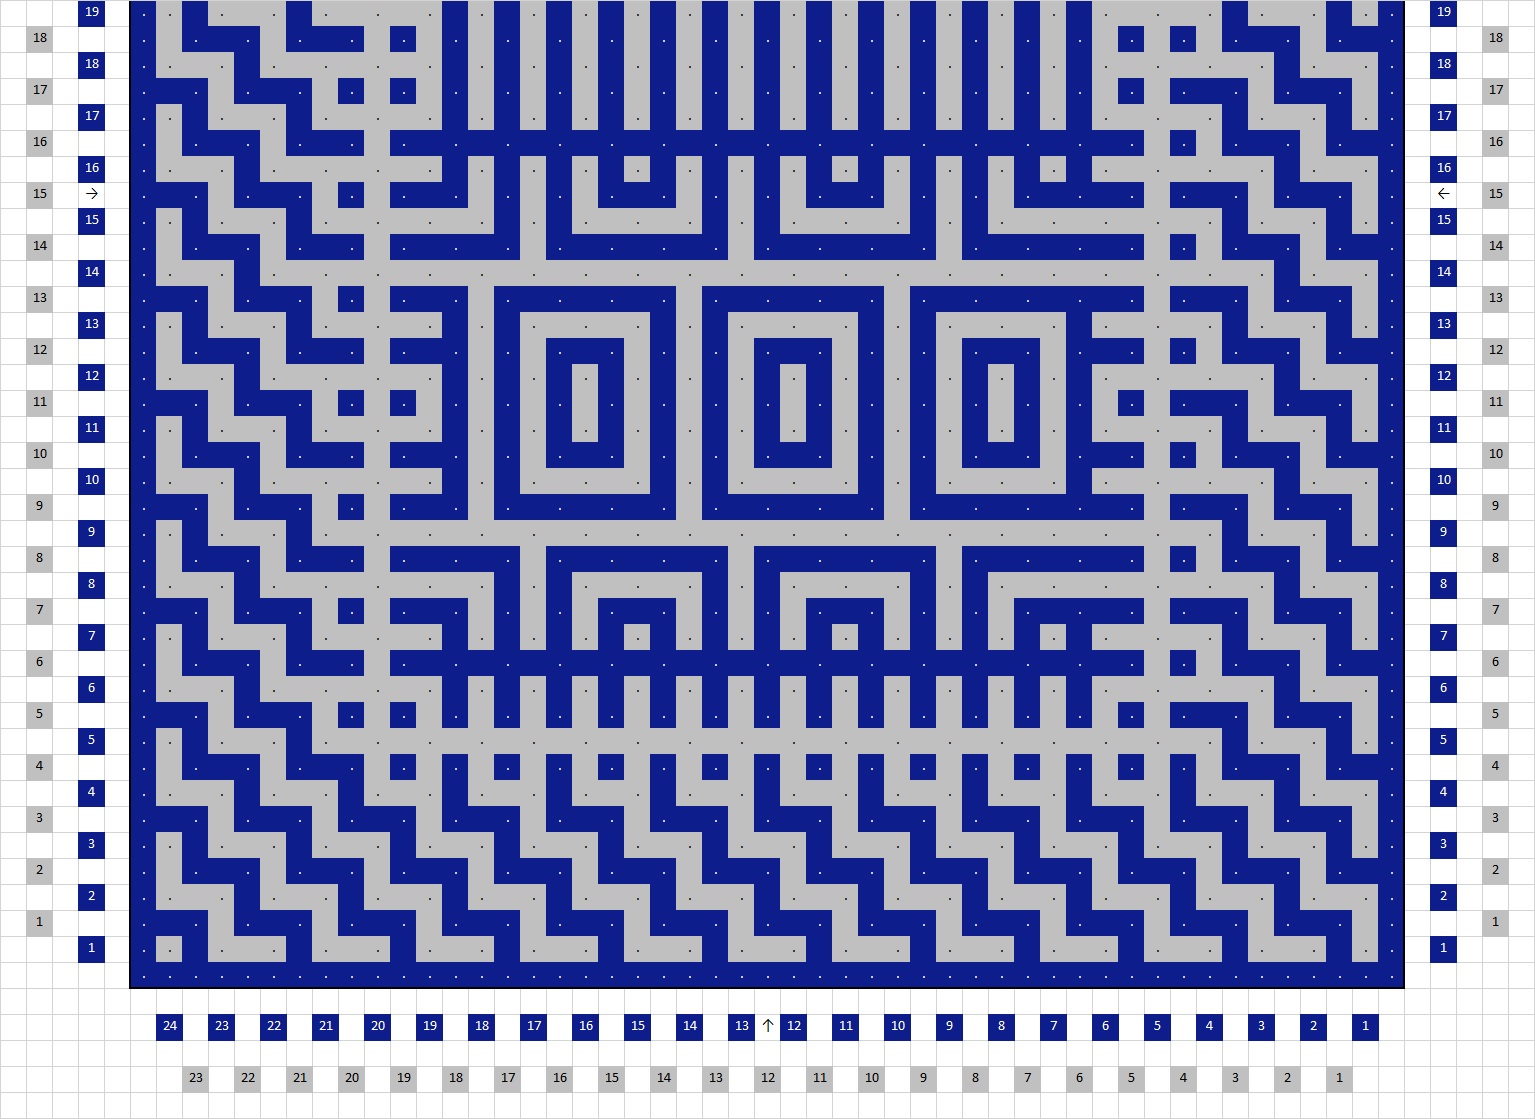
Full charts of adding stitches to the central part