
Why this special
This special is especially focused on ‘reading’ the pattern charts for interwoven or locking crochet. In the facebook groups of the Hooked and Locked CAL people wanted to learn better how this goes exactly. During the video and also here on the website I did pay attention to it, but the focus on the crocheting, especially at the start, was too distracting. Of course there are the written versions of the pattern, but for those who are more visually focused I will dive into this more deeper here.
Video
The video for this subject can be found here. Or look at the end of this page.
Adapting the pattern
This special is also handy for adapting the pattern. People wished a couple of times to make the pattern wider or smaller. I will make another tutorial for that also.
Important
Pay attention, this is a course, so take your time to understand it.
Important: click on the small pictures to see the full picture. You will need that for the explanation!
You can store them on your computer and enlarge them.
How to do the crocheting will not be repeated here. Look for this at the tutorials with the practice piece (click here) and at the start of the blanket (click here). Here I will just focus on reading the pattern charts.
2 Patterns
Click on the charts to download them for the full versions and print them.
You have 2 versions of the pattern charts: one for the front and one for the back. It’s important to remember, that you use the front for the odd rows, the chart for the back is used for the even rows. In these charts I put circles in green at these places.
2 Colors
The pattern uses 2 colors. Color 1, that surrounds the entire pattern, and color 2 that makes the ‘inside part’. On both sides of the pattern you see 2 columns with the row numbers. The numbers at the inside are for color 1, the a-rows. In this case it’s blue. The numbers on the outside are for color 2, the b-rows. In this case it’s grey.
The first setup rows: rows 0a and 0b
At the bottom of this pattern you can see that 24 squares have to be made. This means you have to make (24×2)+1 = 49 stitches. In this number the stitches for the first double crochet of row 1a are NOT(!!!) added.
For color 2 23 squares have to be made. This means you have to make (23×2)+1 = 47 stitches. Also for this one the stitches for the first double crochet of row 1b are NOT(!!!) added.
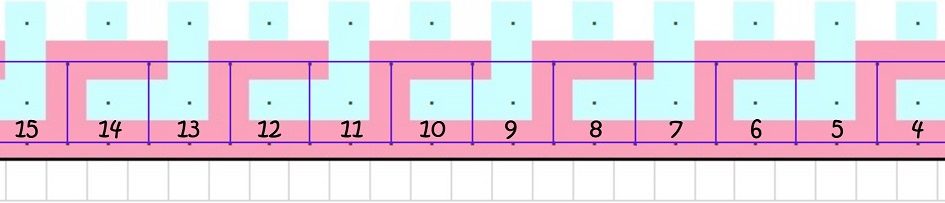
The squares in the pattern

Click on the picture to download the full version and print it. This time it’s blue and pink, that’s a bit easier to see for this part.
In the pattern charts the squares that you have to crochet are not quite visible. It is not very important, but you can identify them. In this pattern part you see that pink is color 1. If you horizontally connect the dots of the first row, and the dots of the row that has the blue 1 in front of it, you will get the bottom and top of each square. The bottom row is the setup row here of course. The top row is the top side of row 1a that has to be made.
What probably may be confusing, is that you already see parts of the next row drawn over it in blue. The top side in the chart is not an entirely pink row, but if you should have crocheted row 1a in pink, you would get an entire pink row. This can be very confusing, so just ignore that.
If you connect the dots in these rows vertically, you will see the double crochets of row 1a. In this chart you have 20 squares, with 21 double crochets. The first and last part is always a side stitch. This is not in front or at the back, but just on the side of your piece. I call especially the last double crochet sometimes front or back in my written patterns, just because it makes a pattern repeat simpler to write down, but it’s just a side stitch.

Here you see the same for row 1b. You connect the dots horizontally in the rows where the pink 1 and the pink 2 is in front, so the rows above and under where the blue 1 is. If you connect the dots of these rows vertically, you will get to see the double crochets of row 1b. You will get 19 squares in this chart, with 20 double crochets. That’s correct, because the inner side always has 1 square less than the outer side. For b-rows the placement of the first and last double crochet always is important, front or back, in contrast to the first and last double crochet of an a-row.
You see here also that the top border is not entirely blue, because the double crochets of the next row are already drawn into it.
Where to focus on

For an a-row
The top and border of a crocheted row are not that important actually. What is important with interwoven crochet, is whether the post of a double crochet is in front or at the back of a previous row in the other color. In the chart here I made a circle around the 1 in the pink square at the right. If you would write the pattern down for this row 1a (because this is about color 1), you have to look at the ‘posts’. I’ve marked them with the circles. Pink means in this case that a dc has to be made in front, blue means a stitch has to be made in the back.

For a b-row
In this chart for the b-row you see that the focus is on blue. I didn’t draw the squares and the posts in this chart here. You only have to look at the row where the 1 in blue is standing in front. This means that everywehere where a circle in blue is, it’s a dc that has to be made in front. Pink has to be made at the back. The opposite of an a-row.
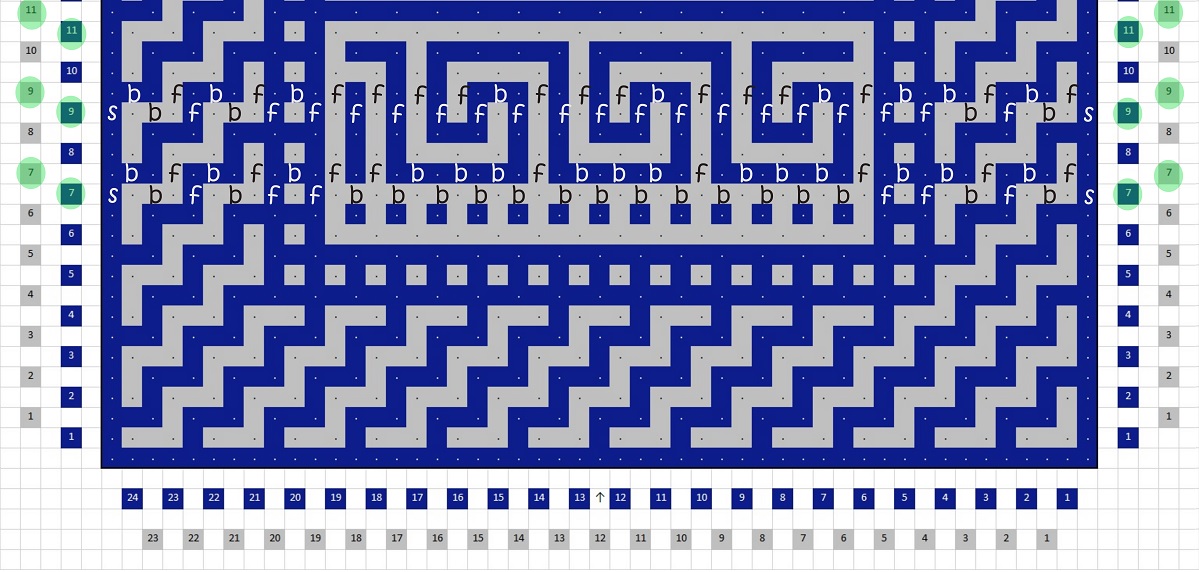
The odd rows written down
Look again at the picture of the front side in blue and grey. I’ve elaborated on the rows 7a, 7b, 9a and 9b.
Row 7a
Look at the row where the blue 7 is in front. This is an a-row, because this 7 is in the column that is closest at the pattern. So the focus is on blue in this row. Blue means front, grey means back. The first and last stitch are side stitches.
I used these abbrevations: s for side stitch, f for front, b for back.
We will be reading fromt right to left: s, b, f, b, f 2x, b 13x, f 2x, b, f, b, s. In total this is 25 double crochets (24 squares ==> 25 double crochets).
A little footnote with this: I understood from lefthanded people that they read the pattern from left to right!
Row 7b
Look at the row where the grey 7 is in front. This is a b-row, because this 7 is in the column that is farthest from the pattern. So the focus is on grey in this row. So grey means front, blue means back. This is a b-row, so we don’t have a stitch that’s on the outside border.
We read again from right to left: f, b, f, b 2x, f, b 3x, f, b 3x, f, b 3x, f 2x, b, f, b, f, b. In total this is 24 double crochets (23 squares ==> 24 double crochets).
You can write this down shorter of course. Take a look where there is a repeat in the pattern. So an alternative is f, b, f, b 2x, *(f 1x, b 3x)* 3x, f 2x, *(b, f)* 2x, b. If you do something like this, check if you still have 24 double crochets.
You do exactly the same for the rows 9a and 9b. And of course this also is done the same for the previous and next odd rows.
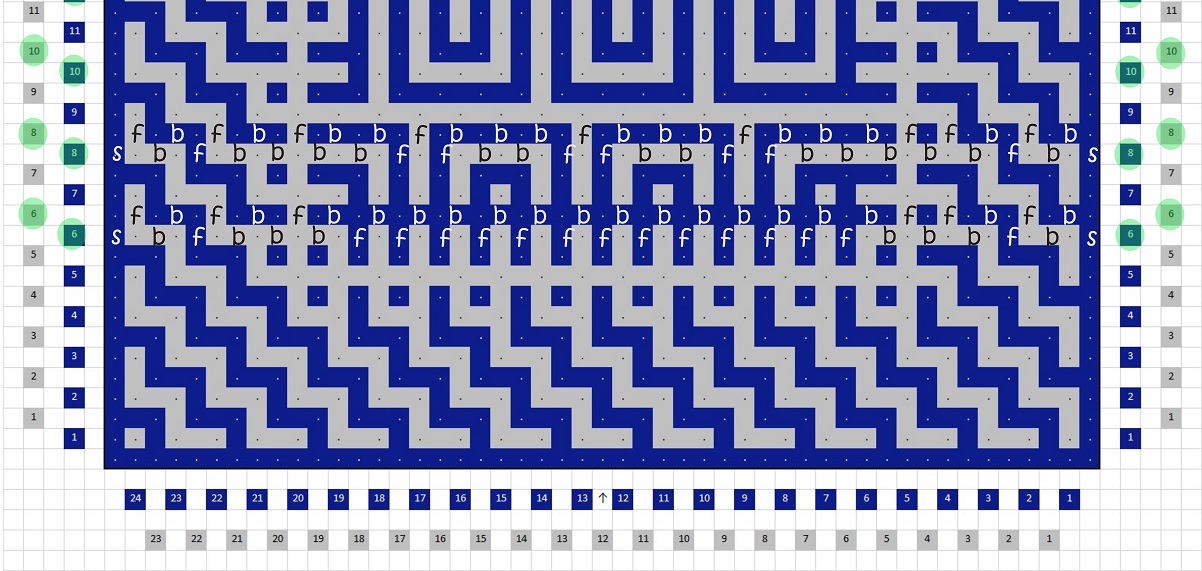
The even rows written down
Look again at the picture of the back side in blue and grey. I’ve elaborated on the rows 6a, 6b, 8a and 8b.
Row 6a
Look at the row where the blue 6 is in front. This is an a-row, because this 6 is in the column that is closest at the pattern. So the focus is on blue in this row. Blue means front, grey means back. The first and last stitch are side stitches.
We read from right to left: s, b, f, b 3x, f 13x, b 3x, f, b, s. In total this is 25 double crochets (24 squares ==> 25 double crochets).
Row 6b
Look at the row where the grey 6 is in front. This is a b-row, because this 6 is in the column that is farthest from the pattern. So the focus is on grey in this row. So grey means front, blue means back. This is a b-row, so we don’t have a stitch that’s on the outside border.
We read again from right to left: b, f, b, f 2x, b 14x, f, b, f, b, f. In total this is 24 double crochets (23 squares ==> 24 double crochets).
You do exactly the same for the rows 8a and 8b. And of course this also is done the same for the previous and next even rows.
Positioning of color 2 at the start of an a-row in color 1
Before you start crocheting with color 1 you have to take care of where to lay the thread of color 2, to the front of the piece or at the back. This has to be done right at this moment, to take care that you can crochet the first double crochet of color 2 at the right side. So this only plays a role in an a-row!
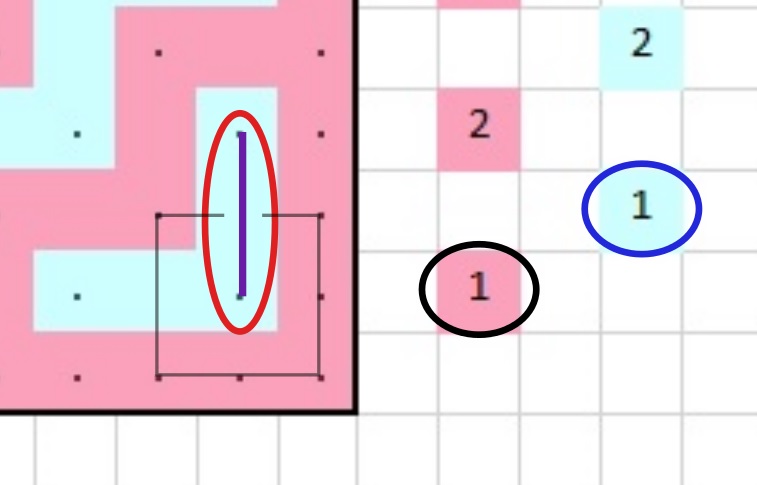
In this picture I’ve drawn a square at the start of row 1a. The top border of the square is the top side of your crocheted row. You see that a blue square crosses that top side. You have to remind, like I told before, that when you crochet this a-row, you will only see pink at the top. But later, when you will crochet row 1b, you will see that the first double crochet as to be on top, so this has to be crocheted at the front. The instruction for row 1b will start with f (front). This means that you have to put the thread in front at the start of row 1a.
Or even simpler, if you make the instructions for row 1a, already take a look at how row 1b starts. Row 1b starts with front, so lay the thread in front.
In this picture I’ve drawn a square at the start of row 4a. The top border of the square is again the top side of your crocheted row. You see here now that it is just in pink. When you will crochet row 4b, you see that the first double crochet must fall under the pink, so that will be crocheted at the back. The instruction for row 4b will start with b (back). So that means you have to put the thread to the back at the start of row 4a.
Or even simpler, if you make the instructions for row 4a, already take a look at how row 4b starts. Row 4b starts with back, so lay the thread at the back.
Further tips
If you have printed a pattern, and you’re working on row 4a for example, place a paper over the rows above or under it, or over both. Or use one or more post-its, they stick nicely and don’t shift. This helps with focussing on the right row.
Write down the pattern in letters before you start. This can be done on your pattern if you’ve printed it large enough, like I did in the blue/grey patterns, or on a separate piece of paper. This also has the advantage that you can see at which row you are in the pattern.
Look at where the repeats are. That’s easier to remember if you are crocheting.
Ending
I hope this was again a handy tutorial for you. Let me know if you’re missing something or if something is not really clear.