
Playing with the upper border

I went to draw again, working on what I had previously thought of for the upper border. I took the upper 2 rows of the big design (see my previous post) and put that on my design paper (see for downloads here), and started to try out some things. At the left part, with the blue, orange, licht and dark pink, you can see I added 2 extra rows on top of the original top rows. On the right I did only do 1 extra row.

I decided that 2 extra rows would be too much, so I started looking for extra options if I would just use 1 extra row. Here you can see that the knots in the row on top are alternating colors. But I decided it was a bit ‘busy’.
In the end I decided for the design hereafter: 1 extra row on top of the original design, and not so ‘busy’ because of the repeat of the row of knots in the same color as the row below it. This is only a part of the border, but it’s quite simple to figure out the rest of the border, because the principle for the next colored blocks is the same as for the blue/orange and light and dark pink. But I will make a fully worked out digital version of the design on my computer with my editing software. As we say in Dutch: ‘Komt goed!’


I also did a short elaboration of the left upper part where the repeat of the design touch eachother. I decided to simply repeat the blocks a couple of times in the same order. Here you see the red/yellow block (see the original design in the previous post!) at the left of the purple zigzag-pattern. Now you can easily see how the red threads go through the block, combined with the orange threads of the block at the right side of the pattern.
A thinking-exercise for you!
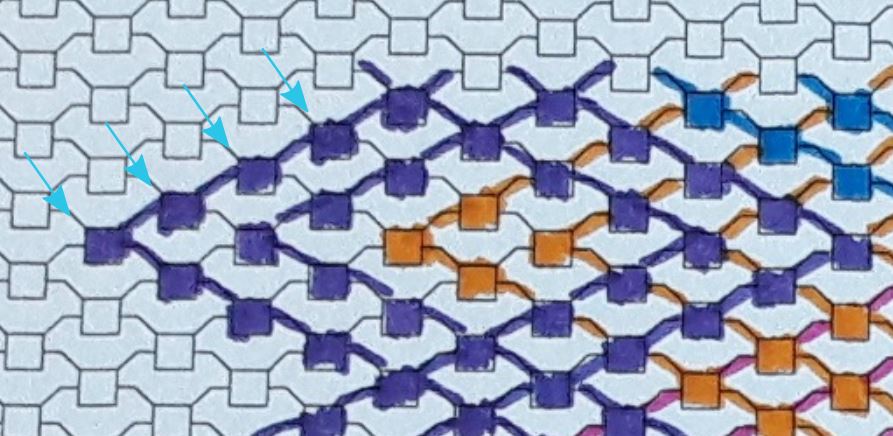
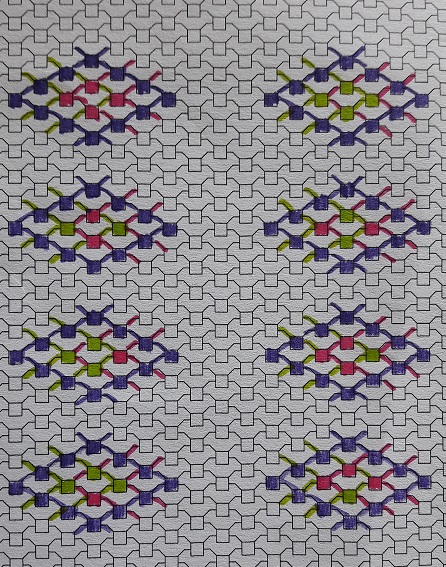
This is part of the design where the left part is not filled in yet. In the previous picture I put the red/yellow block there. But, imagine that you would use totally different colors on this side? I drew a couple of light blue arrows where the red threads were drawn. This means you can take the design, make a second design with completely different colors, and combine these 2 next to each other. You can totally go wild :-). I secretly happen to be some steps further, I am already knotting, and ended up with 8 repeats next to each other. So you could make 8 totally different blocks and join them. You can also choose to mirror the original design. Or just change the order of the colors used. Enough options there for you!
And last but not least: options for the zigzag diamond shape
I also wanted to share the next thing: there also are other options of filling in the square shape at the center of the 2 purple zigzagborders. So here you have them. And you could even think of 2 more yourself :-), but I will leave that up to you :-).
Ending of the design process
You know, each knot you make has an option when you have 2 threads in different colors. You make the knot in color 1 or color 2. And you can play around with that. This is what this design process was all about. You take threads, in different colors, and you let them cross in the direction you choose. I had an idea in mind before I started. But, suppose you would just start, totally unprepared, without symmetry or design in mind or even wanting that. You actually could just grab a bunch of threads in all kinds of colors. Just like that. Random. And then just knot as you go. Just deciding with each and every knot: which color will it be, will I make the threads go straight on or let them make a turn? Who knows what gorgeaous results you could get doing that! To be honest, I never tried it, maybe I should do that once, just for fun. If you would like to do it: please do so and share it! You can do so on my facebook page. I will make a special post there where you can share your wild random bracelets. That would be so fun!
What to expect further?
I’m going to make a digital version of the design. In these posts I just took some pictures of my drawn designs, and not all was worked out entirely, but the moment I’m finished with it I will share it here on my website so you can download it. In my next posts I will also show you what I’m doing while actually knotting this. I’m also making some instruction video’s, where I show you everything step by step how to make this. If you’ve never used this technique to make friendship bracelets, you can just follow along watching it. But, my sweet video-guy has to do some work to make it look great, so please have some patience! Keep following this blog for further updates!
Keep functioning ,remarkable job!
Thank you!